Sizzix Quilt Blog Hop // The Arrow Quilt!

Jenny Sizzix Arrow Quilt

Welcome everyone to the Sizzix Quilt Blog Hop! A bunch of us got together and decided to make some really great quilted projects to show you just what the Sizzix Big Shot Pro, fabi Quilting line can do! You’ll get firsthand project ideas featuring Sizzix fabi dies as well as projects made using our newest Bigz Pro Quilting collection with designs by the artist, author and quilter Victoria Findlay Wolfe!

Sizzix Photo 3


We thought a lot about this project and we just had so much fun creating this arrow quilt, that we wanted to do what we do best and teach you exactly how to make it.  Enjoy this tutorial on the Arrow Quilt!


For this project, we used the Bigz Half Hexi Die, the Bigz Small Simple Wedge Die and Michael Miller’s Fairy Frost Crayon Box Layer Cake.  Choose some yardage for the background fabric and outside border and you’re set!

Screenshot 2015-01-20 21.32.47

We are so excited to announce that we are going to be having a Quilting Retreat with Jenny Doan, Victoria Findlay Wolfe and Sizzix!  The retreat will be October 8th through October 11th and sign-up is now live!  Find all the details on the Event Page!

Sizzix has turned our templates into dies!  You can find them here: All Sizzix products at Missouri Quilt Company

In addition to the amazing projects handmade by each of our spectacularly talented participants, Sizzix will also be giving away a GRAND prize! You can find out how to enter below!

Here is the full list of participants!  If you haven’t visited their blogs yet, go check them out and find out what fabulous projects they created with these fantastic Sizzix products!:

January 16th Jamie Fingal

January 16th Tracy Mooney

January 17th Elizabeth Timmons

January 17th Nicole Daksiewicz

January 18th Ebony Love

January 18th Holly Hughes

January 19th Marni Weaver

January 19th Leslie Jenison

January 20th Karin Jordan

January 20th Sue Bleiweiss

January 21st Jenny Doan (that’s me!)

January 21st Victoria Findlay Wolfe

a Rafflecopter giveaway

Project Notes Notebook (Free Printable and Tutorial!)

If you’re like me, you scribble notes about your project on whatever is nearby. A receipt, on the back of junk mail, etc. That’s why I love this little notebook! It’s so easy to make, and full of graph paper, which is perfect for figuring out the specifics of your next quilt (and keeping them all in one place)!

In less than an hour you can make one of your own. And the best part is, you probably already have everything you need.

DSC_0264

What you’ll need for one notebook:

1 sheet of 8.5 x 11 cardstock in your favorite color
5 sheets of 8.5 x 11 printer paper or graph paper
About 3 feet of book binding string (or embroidery floss will work fine, too!)
Sewing needle
Rotary cutter, ruler, and mat
And this file, printed onto the sheet of cardstock

button

Step 1: Print the free .pdf onto your cardstock. Use your ruler to measure 5.5″ and cut the paper in half. Fold in half as shown in this picture. Now you have two covers. Hopefully you’ll love the first one enough to make another for a friend!

DSC_0226

Step 2: Open the cover and starting 1/2 inch from the top, make a mark every quarter inch along the spine ending 1/2 an inch before the bottom as well. Poke a hole with the sewing needle on each mark.

DSC_0227

Step 3: Then cut and fold the graph paper just like you did the cardstock.

DSC_0230

Step 4: Using the cover as a template, poke holes in the inside paper, a few sheets at a time.

DSC_0232

Step 5: Once your paper is all folded and punched, it’s time to start sewing. Start on the top hole, and draw your thread through the cardstock and all five sheets of inside paper. Sew back to the outside.

DSC_0253

Step 6: Double knot the string and clip the end.

Step 7: Go back down the second hole. Once you are inside the book again, come back up the third hole and loop under the thread between the first and second hole. Then go down the third hole again. Repeat down the entire spine.

DSC_0254

DSC_0257

DSC_0260

Step 8: Once you get to the end, come out the last hole, loop through the previous threads one more time and tie it of with a double knot. Trim the ends of the thread.

DSC_0241

This is what the inside and outside will look like:

DSC_0252    DSC_0250

Step 9: Using your rotary cutter and ruler, trim the edges of your book so they are uniform.

DSC_0244

You’re all done! Wouldn’t these make such a great gift with a charm pack or two? Enjoy!

DSC_0248


Nostalgia and Warehouses

Today’s post is a heartfelt one, written by Al. We hope you enjoy it as much as we have.
——-
IMG_2130
Growing up brings about so many nostalgic moments.
This weekend was a huge one for our company.  HUGE, I tell you!  HUGE!
IMG_2171
Almost six years ago, we started our company in a great big 5,000 square foot building at 100 N Ardinger in Hamilton, Missouri.  It was way too big for us! We refinished the front 1,000 square feet to be our shop and went to work refinishing that space.
IMG_4171
We tore out the paneling and put up some fresh paint and a new floor and that room was great.
IMG_4167
IMG_4238
We got our first internet orders there and we would all package the 3-4 orders a day right up and send them off right from the cutting table.
IMG_4234
IMG_3033
IMG_4435
As we continued to grow, we built a little shipping department in the back, then a machine quilting room.
100_0299
IMG_5423 (1)
Once it became more than just Becky and Jackie answering the phones, we moved our customer service into their own room.
IMG_0763
Eventually, the shop moved to the main street (where it remains today) and that 100 N Ardinger building became strictly shipping and customer service.
IMG_0722
And then it wasn’t big enough for that, even! It was crazy, but we needed more space for our customer service team and a loading dock. Ammon (our warehouse manager) made a great forklift, but his arms were getting tired!
IMG_0782
About a year ago (August 8th of last year, actually) we decided it was time to build our own custom warehouse for our shipping and customer service.  We had all kinds of cool stuff that needed to be in there. We needed a way to get fabric cut in the shops and then connected back into your orders so they get shipped out in a timely manner. We wanted ways of organizing products so that we could always find them, even when we were down to that very last charm pack. But mainly, we needed space.
IMG_0731
So we got building! Winter came and snowed us out for a few months, but we kept going.
This last weekend, we finally moved our shipping over to the new warehouse.
IMG_1656
There were so many moving parts to this move. Did we think of fire extinguishers? What about chairs for the breakroom? (sorry everyone!) Carts for the pickers and bins for the carts? We got bins for the charm packs and layer cakes, but what about notions? What do those go into?
IMG_2079
The move got more and more complex, and was a pretty stressful time for a lot of us. And now (making sure no order was lost in the mix) we are working hard to get everything up to snuff.  Now we have the room to finally hire a few more shippers and get our feet back under us. Our goal by the end of the month is to be back to getting your orders out the day you place them. We are excited!
IMG_2091
With all that hubub going on, I was a little surprised at some of the feelings.  Sarah, Natalie, and myself were sweeping out the 100 N Ardinger building on Saturday night. After everything had been moved out of the front rooms and it was just a few empty shipping tables and shelves, we tidied up the floor and then all sat down and were overcome with this nostalgia.  We’re definitely not sad. This is exciting! We have needed more space for so long!
IMG_2124
But it’s weird, you know? It’s weird to grow up.
We were laughing about the early days there. How every package that has ever been shipped from our company had gone through that tiny room we were all cramped in. Hundreds of thousands of orders have been fulfilled from there. (!!)
IMG_0720
We recalled the days the A/C unit would quit and we’d just sweat and ship.  We remembered how (even before that) we had the Friday night sews, with people sitting on top of people.
IMG_5424
It’s also where the first tutorials were filmed with a little camcorder!
2480_605795793389_4459940_n
Just to have those walls remember such wonderful times choked me up a little.
msqc
A lot of companies have a garage that is their very, very beginning. Ours is that building on Ardinger. It’s that small room in the front where it all started, with Mom and a long arm machine and two shelves with a half dozen bolts of fabric.  And it’s great to remember that, I think.
IMG_4758
I asked Sarah what we should do with that building now. She’s not sure, but one thing is for certain. We’ll keep that front room just like it is. No matter what else we end up doing, we need to be able to walk back in there and remember those feelings that keep this business so exciting.
614736_570257782569_890827761_o
I’m definitely not sad to be moving on from there. We are excited to be growing, but there’s a big part of me that will just miss walking in there every morning to tackle the day.
That being said, it’s nice to finally have room to park!  🙂  Thanks for the journey, everyone. Here’s to another great era in our new warehouse!  Thanks for sticking with us while we improve and learn. I promise you’ll like what we have up ahead!
-Al

Fun with Quilting!

We have some cool little phrases available on bookmarks in our shop and we thought it would be fun to share them customers in the shop AND with the rest of the world. So, world, here you go! From Missouri Star to you, some sweet (and some silly) quilty quotes.

Be sure to tell us which one made you smile the most!

blogquotes-01 blogquotes-02 blogquotes-03 blogquotes-04 blogquotes-05 blogquotes-06

Alan’s First Quilt

If you’ve been following along on Instagram, we’ve been sharing snippets of #alansfirstquilt. Today, he’s here to tell the tale and share photos of the finished quilt. He picked an upcoming line of fabric from Fig Tree called Somerset (look for it in September). Here’s Alan!

—–

2014-06-23 09.38.25

So I made my first quilt and put in the last stitch this last week (Sunday night actually).  A friend of mine, Adrian, was out in Missouri working for the summer with us and wanted to surprise her mom with a quilt and challenged me to make one, too.

2014-06-20 22.06.56

The buddy system worked really well for us, having one of us call the other and say, “Hey, let’s go quilt for an hour or two.” It helped us see our quilts to the end. But quilting really is a social thing, even if you’re just helping each other iron or both messing up on your 1/4″ seams together, it’s great to have a partner in the process.

Screen Shot 2014-06-24 at 12.11.59 PM

Now going through a quilt start to finish, I had a few thoughts I wanted to share.  My honest thought was that I would be a pro already.  I have watched every. single. one. of Mom’s tutorials. I’ve seen her do everything that touches quilting a thousand times (and then some) so I was ready to be a pro. I had it all worked out in my mind, so I was a little surprised that it wasn’t soooo easy. Maybe you’ll get a kick out of this story:

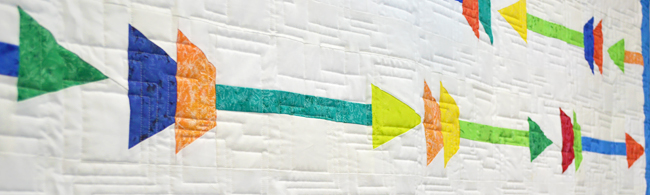
Both Adrian and I chose to do the Dresden Coin quilt tutorial. I was hovering on the churn dash because I love that one, but settled on the Dresden Coin because I thought it would go together a bit more quickly.

2014-05-26 10.15.37

So I needed two Layer Cakes (I’m a big guy) and my layer cake dresden template, I got those and hopped right in. My first obstacle was when I opened up the layer cake I broke the bands on it and was staring at this beautiful stack of fabric… but now what?  I just kind of stood there until I got the courage to start cutting, so I grabbed 4-5 at a time and started cutting my dresden blades.  Cutting fabric is a bit tricky, I kept trying to use the ruler / template as a guard, so I’d angle the blade into it and got some wonky cuts until I figured out straight up and down was my friend.  Game changer right there.

2014-05-29 22.29.13

The other hard spot was after I got them all cut, what next?  I had these big piles of dresden blades and struggled figuring out how to go from a stack to the quilt, so I grabbed two tables and started laying them out. It was turning into a big endeavor because nothing matched anything and it felt like there was no right place. I’d get one row set, then have to change it again because I’d see too much brown.

Then my sister Natalie suggested I just match up two blades at a time and sew them together, then put them into groups of four, then move around batches of four to make my rows.  It made it much more manageable, and I got a few spots of too much orange or too much red. I was too overwhelmed trying to get everything perfect before I sewed my first seam, so Natalie’s way was much better for me.

2014-05-29 22.28.48

This leads me to my next challenge. I had no idea how to thread my sewing machine or set it up. I sent mom a text, “Ma, we need to do a tutorial on the first time you sit down at your sewing machine. I’m lost!”  Thankfully, Natalie rescued me (again!) and showed me how to follow the numbers on our Baby Lock Melody sewing machine. Now I’m a pro! If you don’t know how to do it, maybe just get someone to show you once or twice and you’ll be set.  Then I tried Mom’s Baby Lock Jane (the super fast one she sews on) and broke the thread. I think I put four square knots in that thread before I gave up on it. Moral of the story; not all machines have numbers on them to help you thread that needle.  They should.

Screen Shot 2014-06-24 at 12.12.43 PM

So now got all my rows together and called Natalie. It went a little something like this:

Me: “OK. What do I do if my rows are different lengths?”

Nat: “Just make sure they have the same number of pieces, they’ll be the same length.”

Me: “I did. There is like a 3″ variance in length.”

Nat: “Haha, you’re a dork, Al.  I’ll help.”

 2014-06-16 16.24.31

So, here’s how we fixed that. I cut my sashing to all the same length, then would pull on some rows and be loose on a few and that helped until I got the whole top together.  Then I had a top that had one great side, and one really wonky side.  So, we folded it in half 4-5 times until I had a 10″ strip by however wide my quilt was, then I just trimmed the one side about 1/2 – 3/4″ in and I had a straight edge again. I was ready for my side sashing and my borders.

Screen Shot 2014-06-24 at 12.12.30 PM

Borders were hard to pick! I wanted an orange one from the line, because I like orange. But it made the quilt too soft, so I went with a brown one. It was hard to let my orange go, but after auditioning the fabrics (as mom would say), I knew I was making the right choice.

This was all still work for me at this point.  I kept making the comment “I can’t believe people pay money to do this! It’s so hard!”

Then I went to the quilting department and got our great girls Sandi and Danielle to help me quilt.  Once we got the quilt pinned on, I think I giggled a little. It was happening!  I was so tickled with myself for making something. For doing it!

10497151_811617715524180_6774284479795992668_o

As we quilted, that’s when it started clicking for me.  Sandi was there with us until almost midnight (Thanks, Sandi!). We got it done, and then were off to binding.

2014-06-20 20.23.56

I watched the binding tutorial a few times and got to work.  I kind of found my own stitch that worked for me. Mom said it was a slip stitch and not a ladder stitch, but it looked good and worked fine for me.  I don’t mind a knot or two showing on my backing. 🙂  When I finished, I texted mom: “I’m done with the quilt!” Her first response was, “What?! Who taught you how to bind?” I laughed. “You did! Via YouTube!”

2014-06-20 20.23.49

What an awesome feeling to have made a quilt.  I know where each mistake is. I know the sashing is wavy and the borders don’t match perfectly.  I know my binding is fudged in two parts cause I didn’t sew it onto the quilt right. But it’s done, and it looks awesome (I think!) and I’m so excited to have made something that just a few weeks ago I didn’t know how to do.

2014-06-23 11.54.42

That’s the greatest feeling to me. It’s making something that takes time.  Amazon can’t deliver this. When I give this quilt away, someone will have 20-30 hours of my life, and that’s something I haven’t given anyone for a long time.  Thanks, quilting!