Breast Cancer Awareness Month – Quick and Easy Ribbon Block

From Jenny Doan's Sewing Studio

October is Breast Cancer Awareness Month. Did you know that more than 250,000 women will be diagnosed this year? Many of us have been touched by this terrible disease in one way or another, and when those hard times come, we search for ways to help.

Quilts are a beautiful way to show support and give comfort. Jenny has a tutorial from a few years back for a Ribbons of Hope Quilt but this year as Jenny was brainstorming ways to show her love and support for two of the Missouri Star Family’s very own Breast Cancer Survivors, she was able to come up with an even easier way to make a Ribbon Quilt Block.

Breast Cancer Awareness - Ribbon Quilt Block from Missouri Star Quilt Co.

Isn’t this Ribbon Block so stunning and powerful? It’s as simple as snowballing a few corners. Jenny got the idea from the X’s and O’s Quilt Tutorial and we want to share how it was done with you. Watch the video below for a mini tutorial on how to make this Ribbon Block and to hear Betty and Sherry’s stories of how they won their battles against Breast Cancer.

Check out the block diagram below. Use one block to make a pillow like Jenny or multiple blocks to make a table runner or quilt!

Ribbon Quilt Block from Missouri Star Quilt Company

While October is Breast Cancer Awareness Month, we know that there are many out there affected by other types of cancer. You can make this Ribbon Quilt Block in another color to show your support to those battling other forms of cancer as well. Stitch by stitch, we can make a difference.

Easy No Sew DIY Fleece Blanket

Easy No Sew DIY Fleece Blanket

Here in Hamilton, Missouri, the first hints of fall weather are upon us, and we know winter weather will be here soon. Short days and long nights can be chilly, and there is nothing better than curling up with a cup of hot cocoa and a warm blanket.

One of the best ways to add some snuggle to your fall and winter days is with fleece, and Missouri Star Quilt Co. has a wide selection of solids, prints and licensed designs that will warm you up in no time!

With so many fun designs, there is something for everyone! Check out our full array and patterns for using this fuzzy material HERE (pajama pants, need we say more?!)!

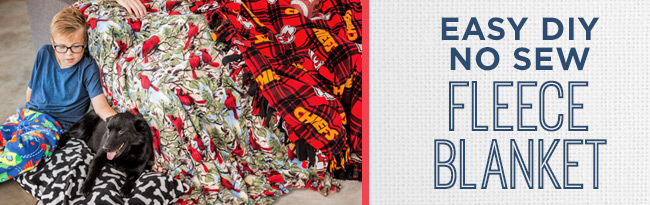
Perhaps the most popular way to get your fleece fix is by creating a No Sew Fleece Blanket. When we want a quick break from the sewing project we’re working on, this blanket is a fan favorite here at Missouri Star! It is a fantastic way to make a quick and easy gift, and a fun project to make with your children or grandchildren. 

We have such a great time making these blankets that we wanted to share some quick tips on how to make one…or a dozen! If you would like to see how Jenny Doan makes her no sew fleece blankets, check out her tutorial HERE.

Here’s what you’ll need to make a blanket like ours:

Supplies Needed:

Optional:

Supplies for No Sew Fleece Blanket

Easy No Sew DIY Fleece Blanket

Step 1: Find your Fleece: To create a throw-size blanket, you will need two yards of two different fleeces. We suggest using a fun pattern for one side, and a coordinating solid on the back. The options are endless, so mix and match to find the combination you are looking for!

Step 2: Put fleece together, right sides facing out. You’ll know which way the right side is for a print, but if you are ever confused, fleece has a bit of a nap to it, so when using a solid, make sure the fuzzy, slightly textured side is the side you’ll be snuggling up to.

Step 3: If your two pieces of fleece aren’t exactly the same size, now is the time to square them up if you would like, and don’t worry if they aren’t perfect…we think that finished is better anyway. 🙂

Step 4: Cut out the corners. Our first cut is at the corner. For this example, we wanted to make our fringe 5 inches long, so we cut a 5-inch square out on each of the corners. (Tip: Jenny suggested we use the cardboard square from a charm pack as a template for this step, and it works wonderfully!)

DIY No Sew Fleece Blanket

Step 5: Cut the fringe. After cutting out the four corners, we cut the fringe using the Fringe Cut Express template to ensure our fringe was uniform around the edges. Our fringe was 5 inches long, but you can definitely make yours a little longer or shorter if you like!

Make a DIY No Sew Fleece Blanket

Step 6: All knotted up! Once all 4 sides are completely cut out, it is time to start tying some knots! We discovered that there are a couple of ways to tie the edges that give each a different look.

Option 1 Balloon Style Knot:

1. Keep both pieces of fringe together (print on top of solid).

2. Place index and middle finger of your left hand at the base of the fringe.

3. Wrap tail of fringe around the two fingers, looping the tail over the top like you are tying a balloon.

4. Bring the tails through the loop, keeping the print side (or whichever you would like) facing up.

5. Secure the knot, and position it closer to the blanket.

Option 2 Shoe Lace Style Knot:

1. Take one piece of fringe in each hand.

2. Cross the pieces of fringe and make a knot like you would if you were beginning to tie shoelaces.

3. With the solid fleece crossed under the print, bring the print fleece (or whichever you would like on top) up through the solid loop.

 4. Secure the knot, tightening as necessary.

Once you’ve tied your last knot, your DIY No-Sew Fleece Blanket is ready to be enjoyed! We recommend it for keeping you cozy under Friday night football lights, snuggling up with it with a good book and/or an extra layer of warmth when you are enjoying a fall bonfire.

Missouri Star Quilt Co. has fleece for the entire family, fur babies included! Be sure to check out all of the fleece offerings HERE, and once you’ve made your No Sew DIY Fleece Blanket, share it with us on Instagram and Facebook using #msqcshowandtell!


Amy Smart’s Patchwork Forest Using 10″ Squares and Fat Quarters

CLICK HERE to watch the Facebook Live video that teaches this project!

A few years ago, our friend Amy Smart (Diary of a Quilter) came out with a free Patchwork Forest Wall Hanging Tutorial that people are still talking about and making in every which way they can imagine! We love it, especially the free improv method she uses for creating the tree shapes! Every tree is slightly different and that’s what makes it so fun to make and such a cute finished project! So, we’ve collaborated with Amy and are excited to be able to share these new cutting instructions so that you can make the same great Patchwork Forest blocks using precuts! We’re focusing specifically on 10″ squares and fat quarters and hope this makes you even more excited to try out this fun, improv pattern!

First, let’s start with the 10″ squares.

Supplies Needed:

  • 1 Pack Holiday Themed 10″ squares (42 squares)
  • 1/4 yard Brown/Gray fabric for tree stumps
  • Backing Fabric
  • Binding Fabric

If you think about the ultimate shape of your blocks, they are not square, but are taller than they are wide. so, if you start with 10″ squares, you will cut off a 2.5″ strip to save for border, binding, or another project. Once you’ve done that, you will cut another 2.5″ off the bottom and then divide those into 2 parts, which makes your fabric look like this.

Patchwork Forest with 10" Squares

These cutting instructions feature The Cat in the Hat Christmas Ten Squares by Dr. Seuss for Robert Kaufman. Isn’t it adorable?

At this point you will want to divide your fabrics into complementary pairs.

When you start to cut your trees, you will stack your 2 fabrics together first, then cut out your tree shape.

Patchwork Forest with 10" Squares

When you create your tree shapes, make sure to leave enough room for seams on the sides and at the top. Once you’ve cut your desired tree shape, swap the center fabrics so it looks something like this (Each pair should be cut slightly differently to achieve the improv effect).

Patchwork Forest with 10" Squares

To make the tree stump (1.25″ x 2.5″), you will want to sew it to the (2) 2.5″ x 3.75″ rectangles as shown. Here are some great fabric options for your tree stumps:

In Amy’s original tutorial, she shows that you should sew your tree to the short side of the background fabric first, then to the long side. Make sure to place your point past the edge to allow for the 1/4″ seam allowance. There will be some trimming required, but I like to wait until I’ve sewn all the blocks to make sure I’m trimming them all to the same size!

Finished Block Size: Approximately 6.75″ x 9″

If you use your entire pack of 10″ squares, you can make a wall hanging or small quilt that is 7 blocks across and 6 blocks down (42 total). That will make your finished project approximately 43″ X 60.5″ (or bigger if you want to use your leftover 2.5″ strips to make a piano key border! The result is so fun!

You can see that this project makes a really adorable, whimsical project, but I want to assure you that it can also be very elegant and beautiful with different fabrics!

Now, let’s talk about the cutting instructions when you’re making this project out of Fat Quarters!

I whipped up a table runner using a few fat quarters that has a completely different feel to it! I used this Holiday Flourish 10 Holiday Metallic Fat Quarter Bundle for Robert Kaufman.

Supplies Needed

  • 3-6 Fat Quarters (depending on the variety you would like in your design)
  • Brown Scrap Fabric measuring 2.25″ x7.5″ (divide into 6 strips that are 1.25″ x 2.25″)
  • Backing Fabric
  • Binding Fabric (1 Fat Quarter cut into 2.5″ strips is plenty)

Cut each fat quarter into (4) 8″ x 10.25″ rectangles (If you’re only going to make one table runner, then you can just use half of each fat quarter and cut TWO of the 8″ x 10.25″ rectangles. If you cut it in half lengthwise to get the two, then you could use the remaining fabric for binding or even a pieced backing)

Finished Block Size: Approximately 7.25″ x 9.25″

The table runner is made up of 12 blocks. The Finished Table Runner size is approximately 17″ by 39.5″

Patchwork Forest Christmas Trees Table Topper

Using 6 fat quarters, I was able to make 24 blocks (I wanted the variety of 6 different fabrics), so in addition to the finished table runner shown, I have 12 more blocks ready to make a second table runner for a gift! Or, of course, you could certainly make a larger wall hanging with your 24 blocks. With some of the remaining fat quarters, I cut them into long strips to make a scrappy backing. This is a fun, carefree, improve project, so have fun with it and make it your own! #holidaypatchworkforest

Happy National Ice Cream Day!

Now that summertime is in full swing, you’ll definitely need something to keep you cool. Today is National Ice Cream Day and there’s no better excuse to celebrate with one of your favorite treats! We’ve gathered up the whole gang and whipped up a batch of banana splits with all the trimmings, complete with cherries on top. And of course, it’s not an MSQC party without something sewn special for the occasion!

If you’re looking for a fun, festive project, look no further. Get inspired by THIS perfectly pastel color palette and create your own matching ice cream cone table topper and cute-as-can be reversible napkin set with a few simple supplies. Plus get ready for the totally free pattern coming your way this August! In the meantime, this free download is sure to help you celebrate! Make an adorable applique project using this ice cream printable! DOWNLOAD IT HERE

Update 7/27/2017: The Free Pattern is Here!! Click on the Image to see the free PDF, then save it to your computer!

Free Ice Cream Table Topper Pattern from MSQC

How are you celebrating today? Share how you celebrate National Ice Cream Day with us by including #nationalicecreamday in your social media posts!

Table topper perfect for ice cream socials!

Gather around the table with your family and friends to enjoy some delicious ice cream this summer and give it a little flare by adding this cute table topper and darling napkins! They are sure to bring a little bit of extra “sweetness” into your home.

Ice Cream inspired D.I.Y project

Just use a fabric pen to trace the shapes and cut them out in your favorite fabrics with delicious hues!

Just grab a pair of scissors, a fabric pen, and a cutting mat!

Here’s the scoop. You’ll be done with this project lickety split! Here are some of the supplies you’ll need for the applique ice cream cones.

Click here to get the Tula Pink – Straight Scissor 6″

Choose a fabric pen from our selection HERE. 

Choose a cutting mat from our selection HERE.

Reversible ice cream themed napkins

Ice cream can be quite a messy treat! That’s why it’s always smart to keep a napkin close by. This ice cream themed napkin is not only cute, but is also reversible. It’s the best of both worlds!

Learn how to make this adorable napkin HERE.

Find the fabric that we used to make this napkin HERE.

Celebrate National Ice Cream Day with MSQC 
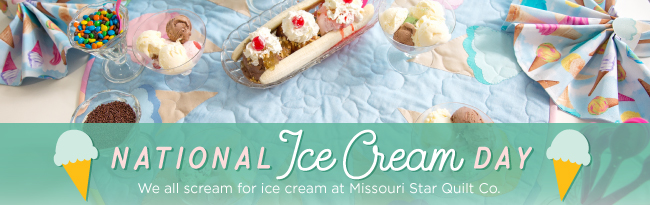
With just a little bit of time and effort, you can have the perfect table setup for your next ice cream social! Be sure to check back with us in August when we’ll have the pattern for the ice cream table topper available. Happy National Ice Cream Day!

Quick, Easy and Reversible Placemats!

If you’re like me, every once in a while you need a break from those big projects to work on something that will give you instant gratification (and add a little pizazz to your house)! It’s even better when you can use that fat quarter bundle you’ve been wanting to cut in to. Check out the process below for these quick and easy reversible placemats I’ve been making lately!

First thing’s first, choose a fat quarter bundle from your stash (or shop for one at Missouri Star Quilt Co. HERE) that you know will look great on your dining room table. We chose to use the lovely Garden Splendor Fat Quarter Bundle by Wild Apple for Robert Kaufman.

You can choose to use the same fabric for each side, or mix and match fabric from the same collection. It’s also fun to pair an Autumn themed fabric with a Christmas or Winter themed fabric. Then all you have to do it flip the placemats over as the seasons change!

Cut your fabric to 14.5″ x 20.5″, place your two fabrics right sides together and pin them in place.

Next, take them over to the sewing machine and sew a quarter inch seam around the edges, leaving about a 3″-4″ opening so that it can be flipped inside out.

Trim off the excess fabric from the corners, remove your pins, and flip the placemat inside out. Make sure to poke the corners out so they are pointy. (Tip: “The Purple Thang” and the MSQC ModBlock Bamboo Creaser Tool work great for this!)

Work out the seams around the edge with your fingers so that they are not rolled inwards, and iron those wrinkles away.

Finally, finish your beautiful placemats up by sewing a quarter inch seam all the way around the edges.

Watch the full process in a past Facebook Live Video HERE.

Insider tip:You can do the same exact process to make a cloth napkin just by cutting your fabric differently! Simply cut your fabric to approximately 16.5″ x 16.5″ instead of 14.5″ x 20.5″.