Artist Spotlight: The Quilting Marine

Join us LIVE on Tuesday June 1st at 11:00 am cst as The Quilting Marine joins Missouri Star Live as a special guest!
The Quilting Marine

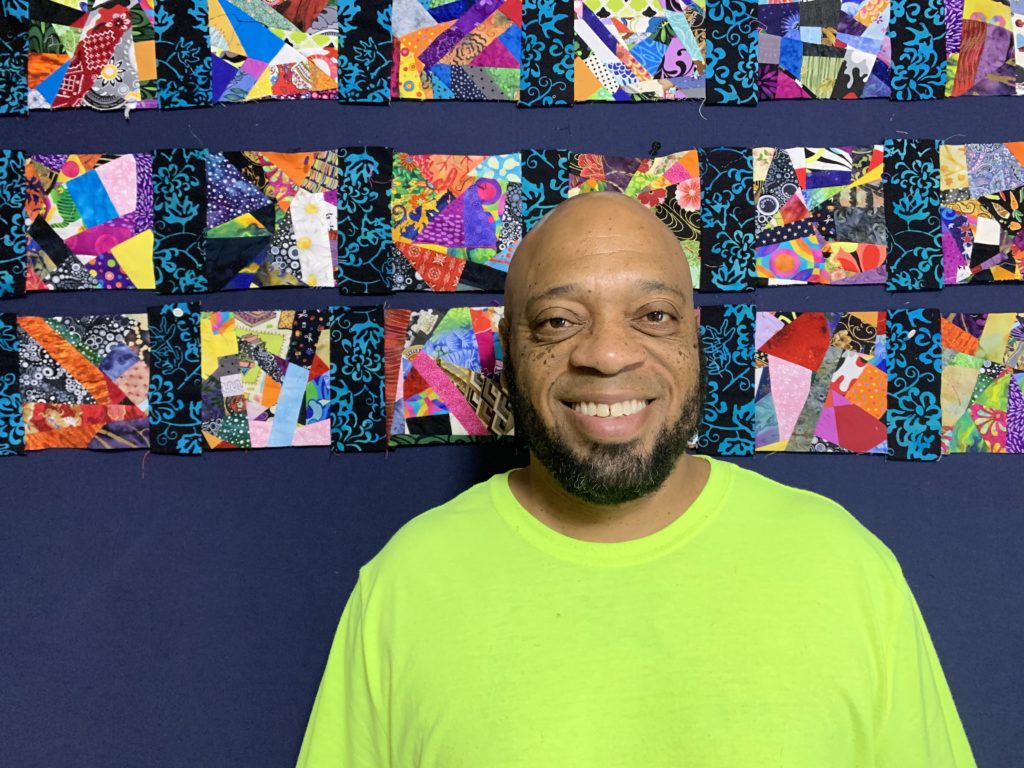
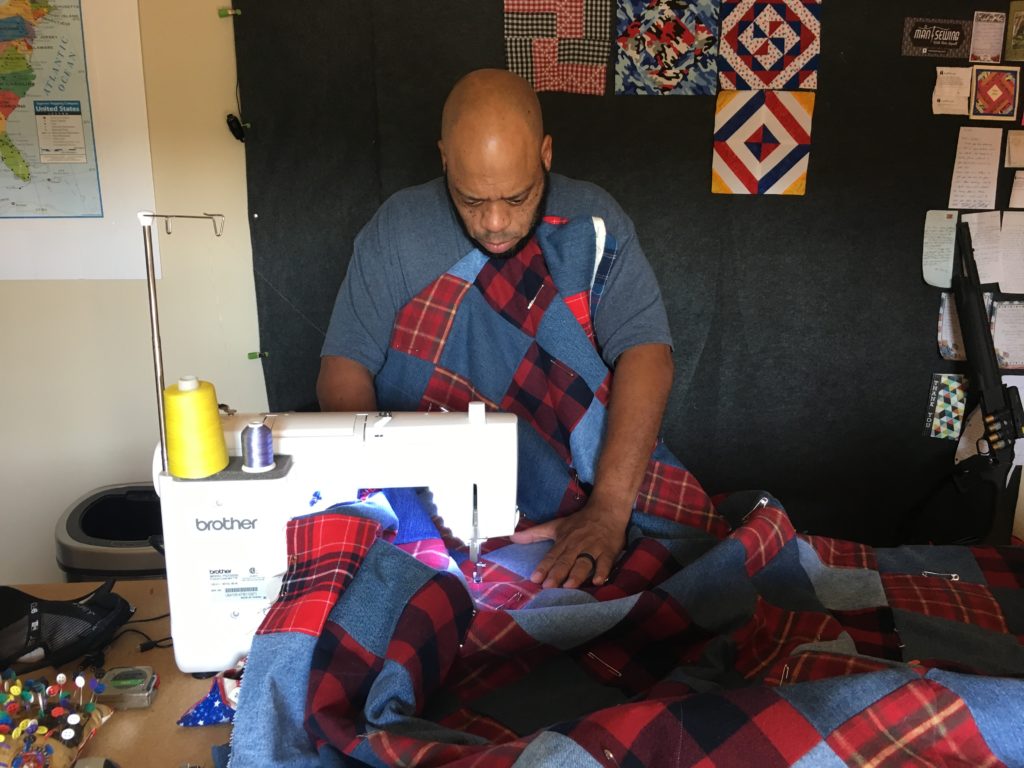
People often find quilting in times of need to help them through difficult situations – that’s how The Quilting Marine first discovered his love for quilting. After serving 20 years in the United States Marine Corps, The Quilting Marine found quilting as his therapy for PTSD related issues. Now, he has a new goal and his YouTube channel says it best, “I taught myself to quilt and would like to help you make quilts that you can admire for years to come.”

What is your favorite part of the quilting process?

My favorite part is piecing the blocks together and giving the quilt away for someone else to enjoy. It’s the building of the quilt for me and is my therapy. I don’t get wrapped around the wheel on everything else. I live behind the mantra of “it’s only fabric” and “it’s only thread”.

Who are your favorite fabric designers?

Robert Kaufman; Michael Miller; Riley Blake; Brother and Sister Design 2009

What notion or sewing tool are you most dependent on?

I depend mainly on my omnigrid rulers, rotary cutters and my machine, the Brother PQ1500sl. And if I had to throw something else in, it would be the Oliso iron.

How were you introduced to sewing and quilting?

I taught myself around the time my grandson was to be born. I wanted to create something for him that was one of a kind.

Join us LIVE on Tuesday June 1st at 11:00 am cst as The Quilting Marine joins Missouri Star Live as a special guest!
The Quilting Marine at work on another project.

What was the most frustrating sewing project you ever worked on?

The one for my grandson was my first quilt and was the most frustrating because I entered a world that I had no idea about. Once I realized that there wasn’t much to create a quilt, that is one of the reasons it attracted me. The repetitiveness of building a quilt keeps me sane. Even though the process is repeated, the result that comes from it is different every time.

What do you do to find inspiration/encourage your creativity?

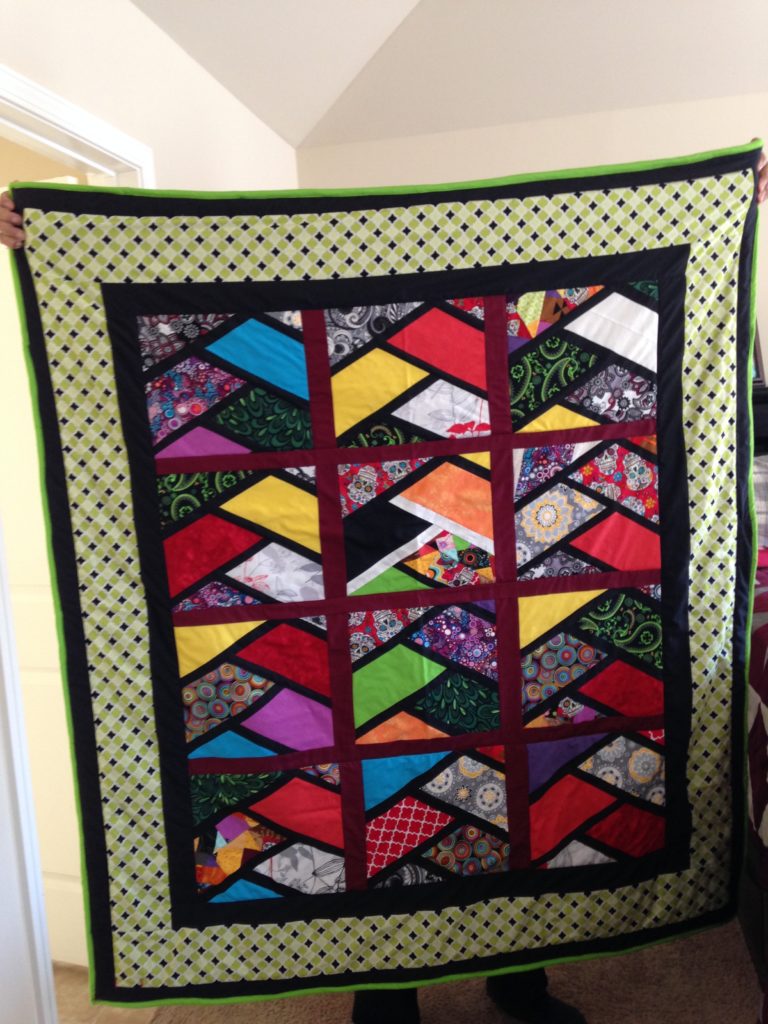
I find my inspiration from watching other quilters and add or take away from what they have created to make it my own. I love using a lot of color when building my quilts. Colors to me bring out the quilt.

What occupation would you like to try if sewing/making wasn’t an option?

I would love to be a hard hat diver/saturation diver. They get paid handsomely to do what they do and the risk is tremendous.

Who is your favorite fictional character?

The Punisher. He is a normal guy who has no superpowers and takes on the responsibility of fighting crime. I like normal guys who do extraordinary things.

Join us LIVE on Tuesday June 1st at 11:00 am cst as The Quilting Marine joins Missouri Star Live as a special guest!
A beautiful example of The Quilting Marine’s artistic ability and craftsmanship.

What fabric have you been hoarding/saving the longest?

Batiks are my all time favorite and whenever subscribers send me fabric, I will hoard Batiks until I find something that the fabric is perfect for. I don’t normally like flowers, I’m not the flower guy but the 2009 Brother Sister Design Studio Fabric has me hoarding it too. This one is super hard to find now so I hoard it as much as I can.

Describe your perfect day.

A day on the beach in the Caribbean with my wife, a fishing rod with a line in the water and no hook and a cool drink. Sleep, wake, piece a block and repeat. Maybe some eating in there somewhere as well.

Want to know more about The Quilting Marine and his incredible journey into quilting? Join us on Missouri Star LIVE, June 1st, 2021 at 11:00 am CST, as he joins us as a special guest! Until then, be sure to follow him on Instagram and Facebook and don’t forget to subscribe to his YouTube channel to keep up with his journey while learning more about the art of quilting.

Thimble Container Cactus Shaped Pincushion

The Missouri Star Thimble Container Cactus Pincushion from Missouri Star LIVE!
The Cactus Pincushion from Missouri Star Live displayed in a terracotta pot.

Long gone are the days of your grandmother’s red tomato pincushion! In the latest installment of Missouri Star LIVE, Courtenay demonstrates how to make a unique cactus shaped pincushion that will not only add a modern elegance to your sewing room, but will keep all of your pins safely tucked away for future use. Whether you’re “planting” your cactus pincushion in a traditional terracotta pot, or celebrating your love for Missouri Star by using a Thimble Container, this handy project is a must-have addition to your sewing studio.

PROJECT SUPPLIES

• (1) 9″ x 12″ green felt square
• Felt scrap for blossom—approximately 1½” x 3″
Fiberfill
Missouri Star Thimble Container or terracotta pot
• 3½” – 4″ styrofoam cube
• Gorilla Glue or similar glue for styrofoam
Wonder clips or binder clips—optional
• Aquarium rock—optional

The Missouri Star Thimble Container Cactus Pincushion from Missouri Star LIVE!
Add your pincushion to a Missouri Star Thimble Container and share your love of Missouri Star!

CUTTING

  1. Use the petal template to trace and cut 6 petal shapes from the green felt.
  2. Cut out the paper cactus blossom template. Use the template to trace and cut 2 cactus blossoms from the accent felt scrap. Set these aside for the moment.
    • Hint: Because you are sewing through layers of felt, you may need to change your needle to a larger size and sew slowly to ensure even stitching.
  3. Lay 1 petal shape atop another, right sides out. Using a medium zigzag stitch, sew around the curved edges, leaving the bottom edge open. Repeat with pairs of the remaining petal shapes to make 3 units.
  4. On only 1 of the sewn units, measure 1¾” from the widest point of the curved edges and mark a vertical center line.
  5. Stack the 3 sewn units, aligning the edges, with the marked unit on top. Use Wonder Clips, binder clips, or pin as needed to hold the stack together. Sew the 3 units together along the marked center line, backstitching at the beginning and end.
The Missouri Star Thimble Container Cactus Pincushion from Missouri Star LIVE!
Pin a fabric flower to the top of your Cactus Pincushion for a beautiful final touch.

FINISHING

  1. Stuff each of the 6 tubes you just created with fiberfill.
    • Hint: The eraser end of a pencil or small dowel comes in handy to stuff the skinny tubes (Don’t forget you may find a wooden rod in your Poly-fil bag!).
  2. Lay 1 cactus blossom atop the other at a 45° angle so that the ends of all 8 petals are visible.
  3. Sew the blossoms together by hand, slightly gathering the top petals so they have 3 dimensions.
  4. Sew the cactus blossom to the top of the cactus.
  5. Cut the styrofoam cube as needed to fit inside the thimble container. Use the glue to adhere the sytrofoam to the inside of the pot. Use additional glue to adhere the cactus to the top of the styrofoam. You can fill the pot around the styrofoam with aquarium rock or even glue some rocks around the base of the cactus to finish “planting” your cactus.
  6. Stick in some of your favorite pins and your cactus pincushion is sure to prickle your fancy!
Watch the Latest Tutorial from Missouri Star Quilt Co!

Needing some more help? Download our Free Printable Pattern or Join Missouri Star’s very own Courtenay Hughes as she demonstrates how to create this adorable, quick and easy project on the replay of Missouri Star LIVE!

Misty’s Into the Woods Kit – Make this Beautiful Quilt with Missouri Star

Meet Misty Doan

Misty Doan is many things. She’s a mom, wife, city councilwoman, model, quilter, Missouri Star LIVE host, and now… a designer!

Misty recently created this quilt pattern, Into the Woods! Check it out HERE!

Get to know Misty and all about her inspiration behind her latest creation and her favorite holiday traditions!

Where do you look for inspiration in your work?

Inspiration strikes in all different ways for me. But, everything I make or design is usually with a specific person or purpose in mind. So I think a lot about that- Who is it for? What do they love? What would make this quilt meaningful to them? What would make this project stand out? I like to challenge myself during the design process by asking lots of questions and that helps guide me to the final result.

What are your must have tools for working on quick kit projects?

Before I sit down to start on any quilt project, I always make sure I have my diagonal seam tape on my machine, a seam guide handy, and a few bobbins wound and ready to go. I do all my cutting first, label my pieces with trusty post-it notes, and then I can just sit and sew, sew, sew!

What tips do you have for new quilters?

Finished really is better than perfect. Take your time, enjoy the process, and remember- it’s only fabric and thread. Jenny always says, “Sewing is a learned skill. Sew an hour today and tomorrow you’re an hour better!”

What are your favorite holiday traditions?

There are almost too many to name. We try to make every holiday special at our house, but Christmas is especially magical. We always decorate the day after Thanksgiving- singing along to our favorite Christmas music and decking the halls together. The kids also make handmade gifts for each other every year that they exchange on Christmas Eve, so Jake and I love helping them with that. (It’s always a trick to keep their plans a secret from the others.) 

Which projects do you work on specifically for Christmastime? 

I always try to make handmade gifts for a few special people each year. What I make is different each year, depending on who it’s for, but there’s something truly special about making time to make something with someone special in mind.

What inspired Into the Woods? Why did you choose those three blocks?

My boys have been spending a lot of time playing in the woods behind our house lately. They’re always adventuring and exploring- bringing back treasures that they find and building forts. I recently made a quilt with my daughter and loved spending time helping her- so it seemed like it was time to make something that the boys would love. The quilt really seemed to design itself once I started. I knew I wanted to use the simple wedge to make the rows of trees, so that’s really where it all started. Then, I decided to include the log cabin blocks as a nod to the ramshackle fort that they’re so proud of building. And lastly the bearpaw blocks just naturally seemed to tie it all together.

State Map Applique Pillow Project

Home is such a special place. It’s where we keep our hearts, hang our hats, and even when we may be miles and miles away, we keep a piece of it with us.

This week’s State Map Applique Pillow project on Missouri Star Live was inspired by a similar idea created by Kelly Young of My Quilt Infatuation that our In-Town Education Manager, Courtenay made to give as gifts to those around her.

**We apologize for the echo at the beginning of this video. It is fixed around the 5:00 minute mark, so feel free to skip ahead!**

Last year, Jenny created the Road Trip Quilt that commemorated some of her recent quilting adventures, featuring simple state map applique shapes that you can find HERE.

How to Print State Map Outlines: 

NOTE: The states are listed in alphabetical order, and reversed for easy tracing. We’re using the state of Missouri as an example on page 25. Keep in mind that each state is a different size and orientation. Courtenay scaled the state of Pennsylvania by 350%. To reach a similar size, we scaled Missouri by 200%.

We’re using these same outlines from the Road Trip Quilt to create the applique shapes for the pillow, but we’re increasing the size of each printed sheet. Follow along for our step-by-step instructions on how to print these applique shapes at your desired size.

  1. Download the State Map Outline Template HERE
  2. Open up Adobe Reader and the State Map template. 
  3. Open the Print dialogue box and select the image number you would like to print from the Pages section: (For this example, we’re printing page 25 for the outline of Missouri.) 
  4. Under Page Sizing & Handling, select Poster
  5. In Tile Scale, enter the scale you would like to increase the page by. For this example, we scaled Missouri by 200%. We left the overlap as is. 
  6. Select Print. Your outline should be scaled and print out in multiple sheets.

Pillow Form Perfection!

Helpful Hint: As Courtenay put together this easy sewing project, she discovered that when using a pillow form, it helps to sew the top of the pillow the same size as the form, and then sew a .5” seam allowance. In Courtenay’s example, she used a 20” pillow form so her top is 20”.

Embroidery Supplies List

Courtenay embroidered the word “home” onto her pillow, and if you would like to do so, too, you’ll need the following supplies:

Make a DIY Face Mask in 12 Easy Steps

DIY Face Masks with Jenny Doan

Learn how to make an easy, washable, and reusable face mask with Jenny.

WATCH THE TUTORIAL

What you’ll need:

  • 2 pieces of 6” x 9” fabric 
  • (1) 6” x 9” piece of iron-on interfacing (optional)
  • 2 pieces of ¼ inch elastic cut to 7” each
  1. Cut out two pieces of fabric to 6” x 9” each.
  2. Cut out one piece of interfacing to 6” x 9” and iron it onto the back of one of the pieces of fabric.
  3. Cut elastic into two pieces measuring 7” each.
  4. Place the two pieces of fabric right sides together.
DIY Face Mask with Jenny

5. Measure a 3 inch opening in the top so you can turn it right side out when you are finished sewing.

DIY Face Mask with Jenny

6. Sew the top and bottom edges only.

DIY Face Mask with Jenny

7. Place the elastic inside the mask and pin it to the top and bottom of each side, keeping it entirely encased in the fabric. It will be on the outside when you turn it later.

DIY Face Mask with Jenny

8. Sew each side completely closed, back-stitching on the elastic.

DIY Face Mask with Jenny

9. Turn the mask right side out from the hole you left in the top. 

DIY Face Mask with Jenny

10. Press the mask flat and add 2-3 pleats.

DIY Face Mask with Jenny

11. Pin the pleats flat.

DIY Face Mask with Jenny

12. Stitch all around the edge of the mask to enclose it and lock the pleats in place.

DIY Face Mask with Jenny

Now your mask is ready! Wash it thoroughly and use it or donate it to those in need.

DIY Face Mask with Jenny

Tips:

  • Be sure to use new fabric, not vintage, that is tightly woven. You can even use polyester or moisture-wicking fabric.
  • If you wish, you can finish the top edge before you stitch the mask together and leave a small opening in the top so that a filter can be inserted into the mask.
  • If you don’t have elastic, you can attach ties to the sides of the mask so that it can be tied on rather than looped around the ears.
  • This mask is not as effective as the N95 or P95 masks used by healthcare professionals, but it can help.
  • If you want to donate your masks, go to “One Million Mask Challenge” or “Deaconess” and check your local needs. If you wish to donate, follow instructions for drop off, keep social distance, and do not drive up to the hospital unauthorized.
DIY Face Mask with Jenny

Running out of elastic? Watch this tutorial to learn how to create a face mask using fabric ties!

WATCH TUTORIAL