

Home is such a special place. It’s where we keep our hearts, hang our hats, and even when we may be miles and miles away, we keep a piece of it with us.
This week’s State Map Applique Pillow project on Missouri Star Live was inspired by a similar idea created by Kelly Young of My Quilt Infatuation that our In-Town Education Manager, Courtenay made to give as gifts to those around her.
Last year, Jenny created the Road Trip Quilt that commemorated some of her recent quilting adventures, featuring simple state map applique shapes that you can find HERE.
How to Print State Map Outlines:
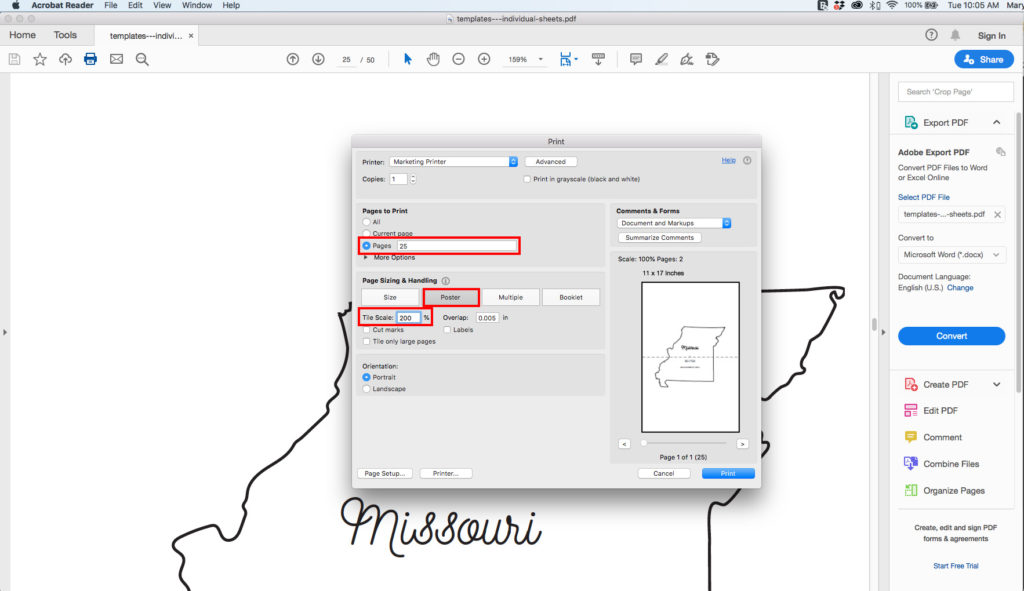
NOTE: The states are listed in alphabetical order, and reversed for easy tracing. We’re using the state of Missouri as an example on page 25. Keep in mind that each state is a different size and orientation. Courtenay scaled the state of Pennsylvania by 350%. To reach a similar size, we scaled Missouri by 200%.
We’re using these same outlines from the Road Trip Quilt to create the applique shapes for the pillow, but we’re increasing the size of each printed sheet. Follow along for our step-by-step instructions on how to print these applique shapes at your desired size.
- Download the State Map Outline Template HERE.
- Open up Adobe Reader and the State Map template.
- Open the Print dialogue box and select the image number you would like to print from the Pages section: (For this example, we’re printing page 25 for the outline of Missouri.)
- Under Page Sizing & Handling, select Poster
- In Tile Scale, enter the scale you would like to increase the page by. For this example, we scaled Missouri by 200%. We left the overlap as is.
- Select Print. Your outline should be scaled and print out in multiple sheets.
Pillow Form Perfection!
Helpful Hint: As Courtenay put together this easy sewing project, she discovered that when using a pillow form, it helps to sew the top of the pillow the same size as the form, and then sew a .5” seam allowance. In Courtenay’s example, she used a 20” pillow form so her top is 20”.
Embroidery Supplies List
Courtenay embroidered the word “home” onto her pillow, and if you would like to do so, too, you’ll need the following supplies:
- Embroidery floss–pick your favorite color!
- Hand embroidery needles
- Pen to trace pattern (any old pen will do!)
- Micron pen to trace the embroidery word
- Small embroidery hoop