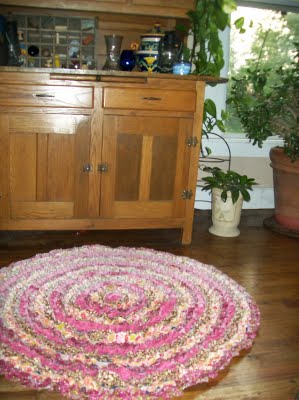
Rollin’ in Ruffles

I made this rug for my daughter’s bedroom.  And thought I would share a couple thoughts on things I love and don’t love.  First I would probably suggest sewing your strips on with the right sides facing out instead of in.  So, that even when it’s been stepped on you’ll still see the pretty colors!  I love that it’s heavy enough to carefully vacuum!  With minimal toe holding this rug in place I was able to vacuum it!  Yay!  And I love that it’s starting to show it’s fringy edges!  Though I do try to keep a little pair of scissors nearby for this beginning, fringing stage 🙂

Without further ado here’s my quick tute of a fabulously fun, little circular rug for you to enjoy!

Supplies~

1 yard of Textured of base fabric
1 yard of Heavy upper base fabric
approx. 44-2.5″ strips wof or Jelly roll strips
Basting spray

I’m gonna talk base fabric first. I chose random fabric that I simply had in my stash and I have a lot of random fabrics! I chose something textured for the bottom as this is likely going in front of a dresser in my daughters carpeted room. I chose a denim for the top because I had it, it was sturdy for light traffic, and it was dark so hopefully it will not look dirty to quickly.
You may choose whatever fabrics you like for your base.
You might consider
a piece of canvas,
or heavy drop cloth,
or a light, thrifted rug
(though I would try to avoid anything to thick for sewing purposes and without a plastic bottom.)
The idea is that it will be completely covered anyway!

Making the base~

Fold your fabric square into fourths and stack both pieces. Using a push pin and a length of ribbon that reaches from the folded corner to the raw edge pin the ribbon down to the folded corner of the fabric. Stretch the ribbon across and holding the ribbon and pencil to swing across the edge mark a quarter circle on the top layer of fabric

Use this as a guide to cut through all thicknesses of your base fabrics.

Lay your base circle’s out right sides together with the wrong side of the heavy layer on the top. Pin around the edge and sew together leaving a small 4″-6″ opening for turning.
Spray the wrong side of the heavy upper circle with basting spray and turn the base piece right side out smooth the circles out immediately so the basting spray can hold it correctly in place.

I did my fabric in circles of receding sizes. If using an actual Jelly roll I would recommend a spiral pattern instead do this by simply curving in slightly as you approach the end of the circle you are working on and continue following the edge never finishing a circle round till you reach the center. I recommend this because of the lack of matching fabrics in a typical jelly roll. Spiraling just gives a more scrappy look.

Add your ruffles~
Start by ironing your strips in half lengthwise and trimming the selvages from your jelly roll strips.

Sew your strip down as close to the outer edge of the upper base layer as you can (less than 1/4″ from the edge), finger ruffling it slightly as you go.

(If you want to follow my learning experience suggestion this is where you’ll want to flip your strips and sew them face down instead of face up like in the picture so that your rug will show more bright colors while it’s in use)

When you reach the end of one strip simply add another by butting the 2 raw edges together.

My outer row took approx. 4 1/2 strips.

If you are spiraling simply curve inwards slightly once you have made a full circle to the next row. If you’re doing full color circles finish a row by ruffling your fabric and trimming it to meet the beginning of the row you were working on and doing a small back stitch.
Then simply scoot in and add another row.
When you add your inner rows pull the ruffles from the outer row away from the fabric strip you’re working with and line up the edge of the new strip with the sewing line of the first to get your placement spaced right.
Continue in this manner adding circles or spiraling inward till you reach the center.
For spiralling simply curve till you get there do a little back stitch and your done!
For circles you will take a scrap of one of your strips and using pinking shears cut out an approx. 2.5″ circle.
When you reach the center there should be a hole about the size of a quarter or slightly smaller left to fill.
Place your 2.5″ circle directly over this space and do a little back stitched X in the center!
Hurray we’re all done!
These are super cute!  And fun for a kitchen, bathroom, or bedroom depending on your jelly roll 🙂
Happy Quilting!

Stars Aligned

Like Mom was saying it was such a fun way to put together those stars.  ( All with strips from a jelly roll.)   This pattern was such a blast to make.

I look at that quilt and can see it in bright crazy colors….or  Christmas colors or red, white and blue or black and white (with a little hot pink in the mix)  Endless possibilities again, huh!

We hope you are enjoying our ideas and tips.  If you have any questions about things, do ask.  We love to chit chat and will try to help you in any way that we can.

Enjoy the weekend.  (and hopefully you’ll get that sewing machine out and play a little!)  🙂

Circles are your friend….

For real!  Could this be any cuter?  Stripey-strip circles just might be my new favorite thing.   I know, I know.  I sound like an obnoxious adolescent that exclaims every song on the radio her favorite. (hey I can say that…I have one!)  🙂  I just get so excited about all the possibilities these pre-cuts give me!!  The convenience alone is enough to win me over! (See the original full tutorial after the jump)

Think of all the scraps you could use.   ( we all have them.  just admit it.)  We are considering starting a “Quilters Anonymous” for all of us fabric hoarders.   Hahaha!!  🙂  Who wants to be President?

Okay, seriously.  I want to mention a few things….Did you see us featured on the MODA BAKESHOP!??!?!  (not. even. kidding!)   We were thrilled.  (okay, okay….maybe more like ‘over the moon’-screaming-jumping up and down-excited) no, really.  You should have seen us.  🙂

Thank you Moda, for that.  We love your fabric and can’t get enough of the pre cuts!

If you haven’t already WHAT are you waiting for!??!?!!?  TRY a Jelly Roll, you won’t regret it!  {i pinkie swear}

Don’t forget to enter the  two giveaways we have going on right now….one in the forums (easy as ever to enter.  just leave a comment) and the Jelly roll one as well.   Only a few days left to enter!
Continue reading “Circles are your friend….”

Easy Peasy Bag….

If you are anything like us, we assume y’all get a “hanker-ing” to make a purse or tote bag.  🙂  Jelly rolls make it easy, that’s why we LOVE them!

We hope you are enjoying all of the possiblities you have when you use these great Jelly Rolls.

*jelly roll used for the purse shown was a Zippity Doo Dah, by Sandy Gervais

Strips and more…the fence rail kind

The fence rail, in my opinion is a fabulous go-to block.  It is quick and virtually pain free.  The best part for me about using a Jelly roll for this quilt (and pattern) is the variety you get.  I am all about the ‘scrappier’ look, and LOVE that it all coordinates!  It really  does make my life so much easier.  🙂

Another variation on the fence rail, would be to use less strips (or more) than we did.  You could also have the same fabric strip as the center and it would make a zig- zag design throughout the whole quilt.  (super cool….But, you may already know all of that!)  🙂

So, have you opened up a delicious jelly roll yet!?!?  Any projects under way?  I am dying to know….

*fabric used in our quilt was  one Fig and Plum Jelly Roll, by Fig Tree & Co. (moda) and coordinating fabric for the border.