A project idea and some random..

Have you seen this yet!?!?  I love how it turned out.  Mom will explain how (in the video) easy it was to snowball the SIX inch squares in lights and darks.  Yes, you read that right.  This Charm pack, Amalie designed by Darlene Zimmerman for Robert Kaufman is SIX inches square!  It just amazes me how they look so perfect together, and really with out a lot of thought.  Dang, those designers know what they are doing, huh!

I hope you enjoy this idea.  It would be fun in all sorts of different fabric, so be creative and have fun.

This weekend…what are your plans?  Me…more SNOW around here.  I hope this time the temps will be bearable for us to at least make a few snowmen.  I actually want to make an entire snow family.  (i am crazy like that)   This winter has been so cold that our snow has just been that horrid blizzard-type snow, blowing everywhere and WAY to cold to take the kids out in.  But today we are getting those beautiful, big wet snowflakes.  I love it every time I look out the windows.

I am also planning on a HUGE Super Bowl party….you know, any reason to get together with everyone I am great with!  I love the commercials too, so I am excited about the funny things those companies come up with.  What about you?  What do you have going?

The First of February…

Wow, this year is already flying by.  🙂  This weekend has gone by like a whirlwind…we have so much going on.  All good stuff , and are super excited about the forums being back up.  If you haven’t stopped in for a while, go by and visit.  There is lots of chatter and projects pics that are being shared!!  (my personal favorite)

We are still doing our weekly giveaway.  To be entered all you have to do is comment.

I had a little fun this morning, making my own conversation hearts!  I am fairly certain that the daily deal addict one applies to several of you.  (especially if we asked your husbands!!) Hahahah!

I could have played at this site all day!  It was so fun to say what I wanted too on those cute little hearts….This has gotten even more into the spirit of Valentines Day.  We are working on a few more projects for you to celebrate the day of LOVE!  Should be sometime this week….so hold your horses and we will be back here with some more easy peasy projects.

What would you put on a conversation heart??  Go here and do it.  Then come back and tell me about it!

Have a great Monday!

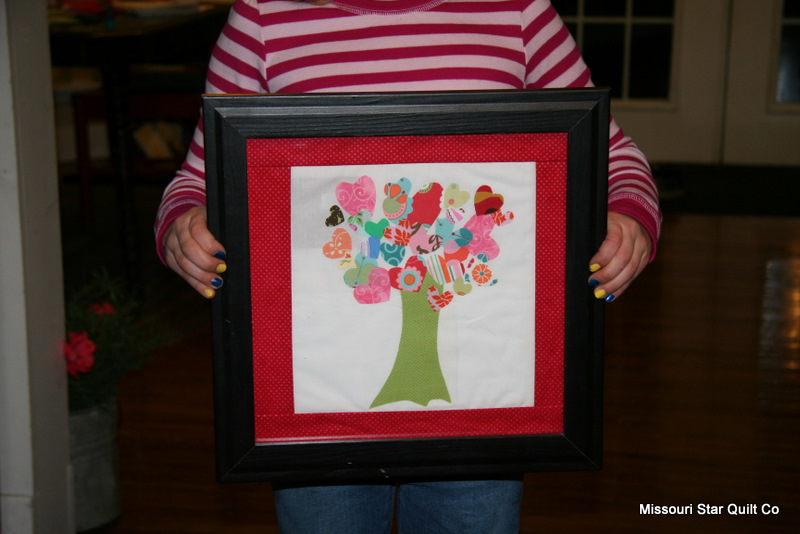
A Lovely tree….

Oh my, we had so much fun putting this together!  WE used a bag of scraps….you know those bits and pieces you save for that ‘someday’ project…..Well, this is it.  It was fast and easy and oh so cute!

We cut up different sized hearts and a tree trunk.  Then just ironed it onto fabric, did a small border and framed it.  I am still trying to decide between leaving it framed or making it into a pillow.  What do you think?

Thanks for BARING with us :-)

Hey it’s me, the YSGLCG 🙂

So you may have noticed we were upgrading our servers yesterday/today. You probably hit a blank page and maybe a few errors as you tried to shop and navigate the site. I hope you’ll forgive us, but this was a pretty major upgrade for us. We are super excited about this (well I’m the only one that gets excited about servers, cables, and python scripts, and…. maybe that’s why I’m not married :P) So what’s up? Well the forum is back, the site is running on our own shiny new servers (so it should be consistent speeds, ie, you’ll never notice those old slow times we ran into before).

Anyway, we’re back at full strength, so watch out! We got space to create, and that’s the whole reason we do this right!? We HAVE to foster our creativity!

Thanks!!

-YSGLCG

Sweet hearts

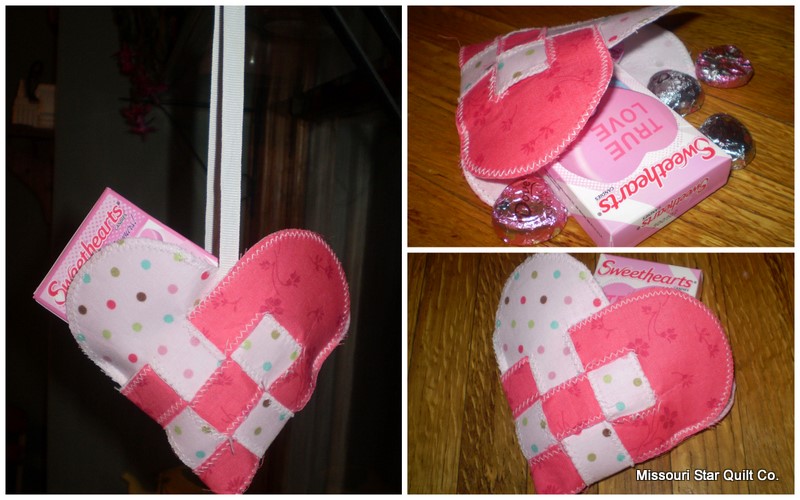
Today we have a cute little craft for you. This is a traditional Swedish heart. We usually make these around Christmas time and hang them in our tree but, we thought it would be cute to use these for Valentines day as well this year!

You will need:

two strips of contrasting fabric (a light and a dark will look best) 3″ x 11″

two strips of heavy fusible stabilizer 3″x 11″

scissors

*sewing machine optional!

First iron on your fusible stabilizer to the wrong side of your fabric. This will reinforce your fabric and give your basket some shape.

Next, fold your strips in half and round off the cut end. I use a small glass from the kitchen as a template. It doesn’t have to be perfect just round off the corners.

Then with your strips still folded in half, on the folded side, make 2 cuts perpendicular to the fold, 1″ apart from each other, and 3.5″ long.

Now comes the tricky part.  We will be weaving through and around our strips as opposed to the traditional over and under type of weaving.

Keeping each strip folded, set them down so that the folded sides face each other.Now take the top strip of your light fabric and weave it in between the layers of your first dark strip. 

Then weave the second dark strip in between the layers of your first light strip.

Next weave the light strip in between the layers of the third dark strip. Your first row is done. Now just repeat  starting with the opposite color. Do this for each strip set and you will be done!

You may want to fray check your fabric if you don’t like the raw edge look. You could also do a decorative stitch around each of your raw edges. We did a zig zag on a couple of them and thought they turned out cute.

If you want a tighter seal on your basket just stitch a small seam at the top of the sides to keep it togetherYou could also add a ribbon or ric rac handle by slipping your ribbon in between the layers of fabric at the center of the heart basket and stitching it down.

Now just fill and enjoy!