Missouri Star Tutorial Reboot Featuring Guest Blogger Amy Smart

Revisited Quilting Tutorials from Missouri Star Quilt Co

amy smart tutorial reboot

Hello fellow quilt lovers! My name is Amy Smart. I learned to quilt from my mom when I was growing up, but have been doing it in earnest since the birth of my first baby 17 years ago. I love share my quilting obsession including patterns and tutorials at my site, Diary of a Quilter and recently published a book, Fabulously Fast Quilts.
Jenny Doan MSQC shops

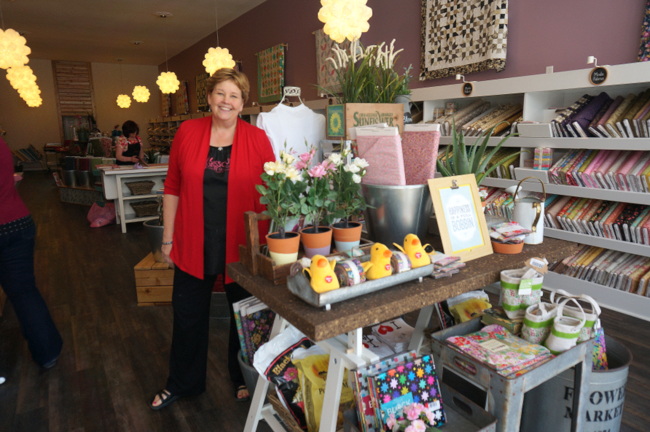
I have been a big fan of Missouri Star Quilt Company and was so excited when they invited me to do an MSQC Tutorial Reboot! Serendipitously, my family had a trip planned to Missouri for Spring Break a few weeks ago and I got to visit Hamilton and the whole Missouri Star Quilt Company extravaganza! You can read more about my adventures in Hamilton in this post, including an amazing grand tour of all the shops by Jenny herself!

Missouri Star Quilt Block

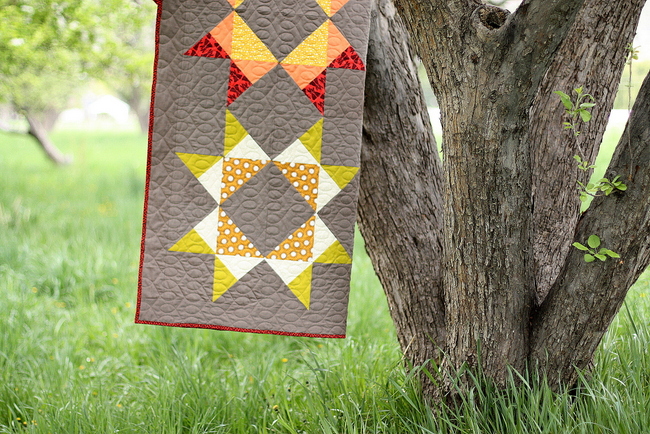
As I looked through the myriad of quilting videos and tutorials from MSQC over the past years, the one I was most excited to make myself was the classic Missouri Star block itself. (Seems appropriate.) I’m a sucker for large quilt blocks, especially stars, and I loved the scale of Jenny’s block. I’m also a big fan of short cuts and quick piecing and I loved Jenny’s method for creating this block quickly using pre-cut 10″ x 10″ squares.

Missouri Star Quilt Block

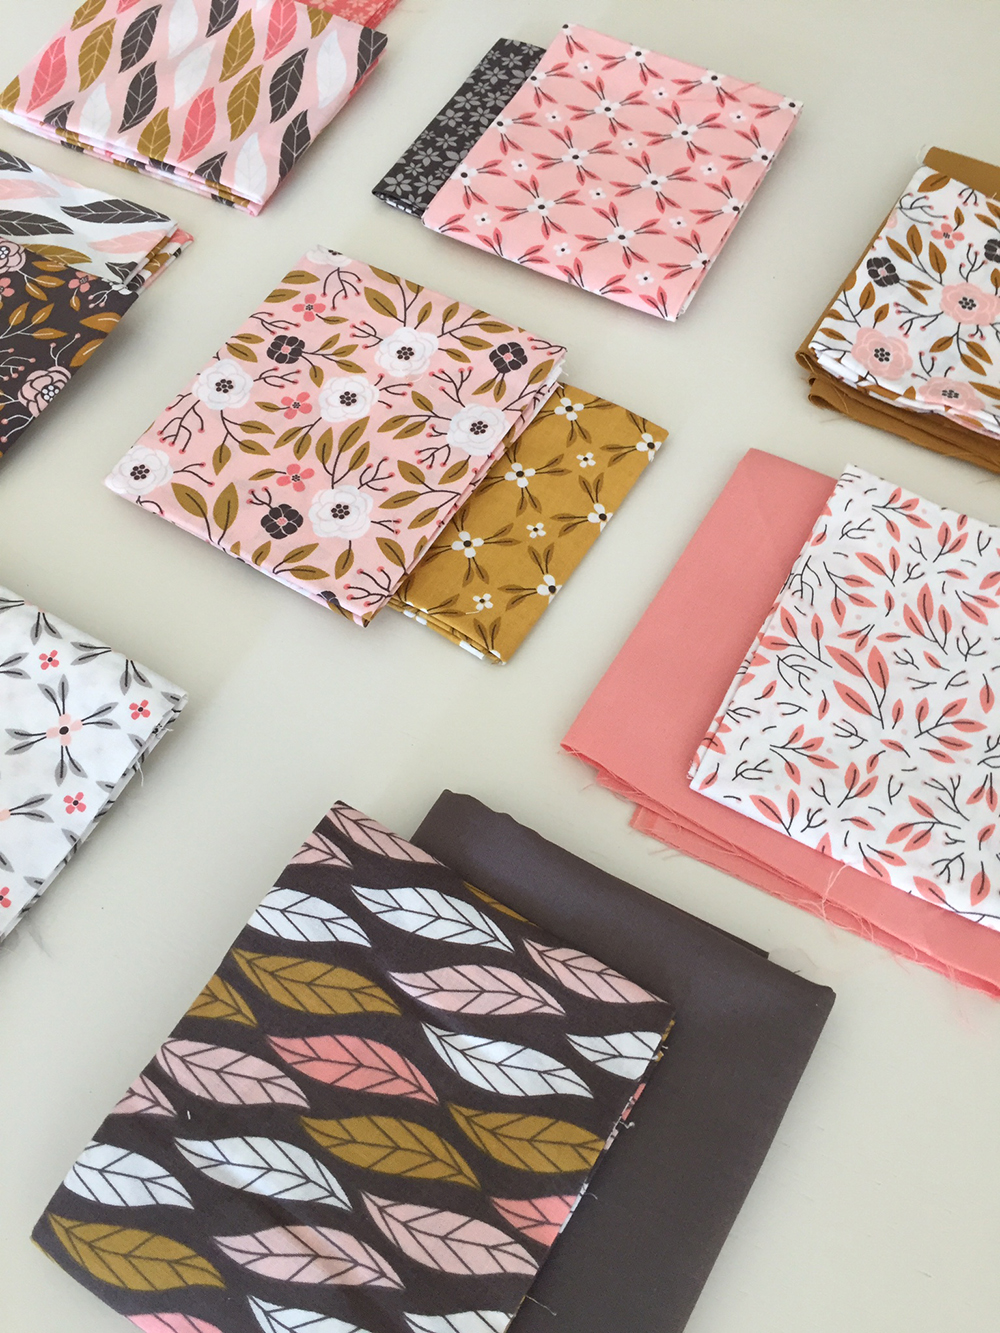
The large scale of the block lends itself so well to a modern, graphic design. I thought I’d pair a darker, woven solid with some bright, modern prints to change the look a little bit.

Fabric Requirements

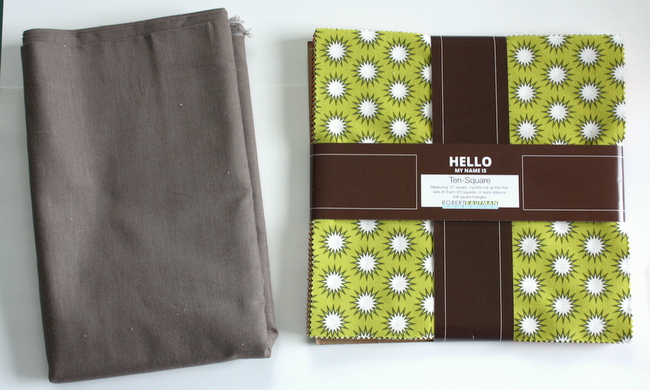
I used Peppered Cotton from Studio E in True Taupe as my background (I love the subtle, homespun texture that comes from a woven) paired with a 10″ x 10″ set of precuts from Elizabeth Hartman’s Warm Pacific collection.

Fabric Choices

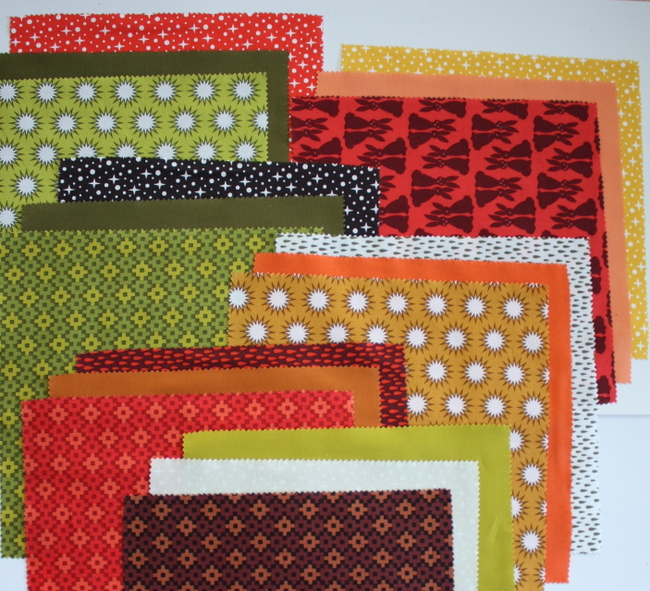
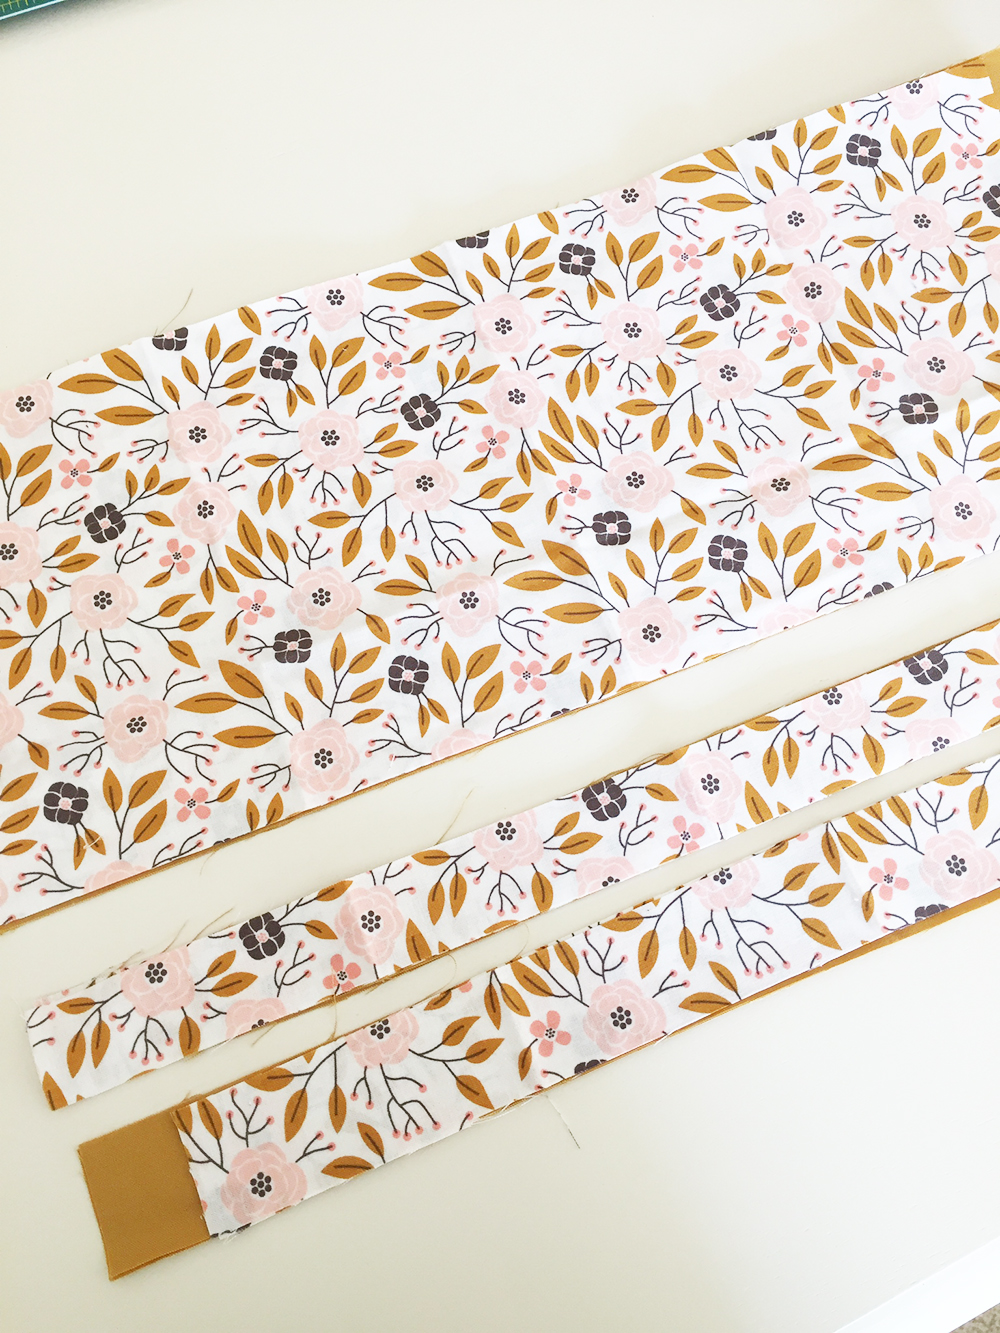
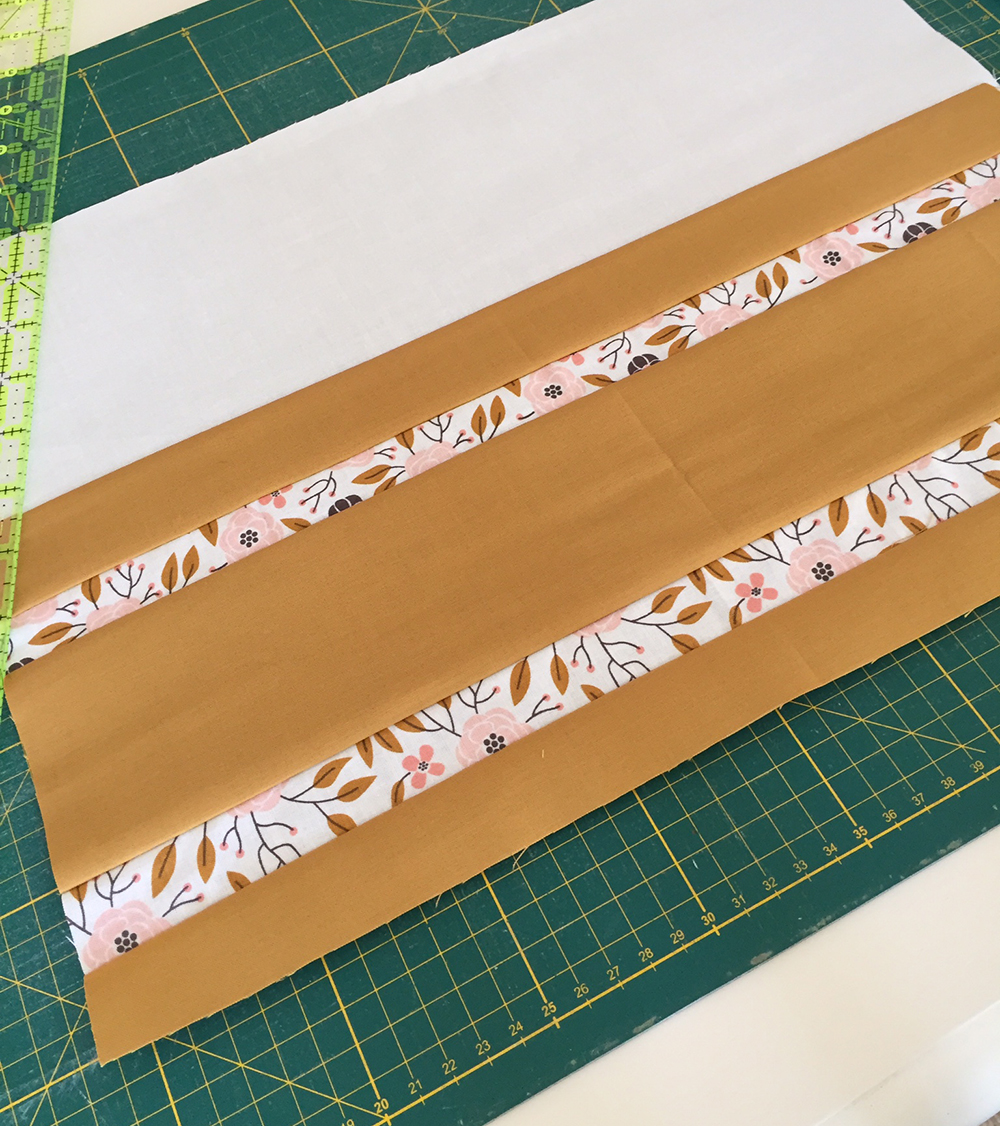
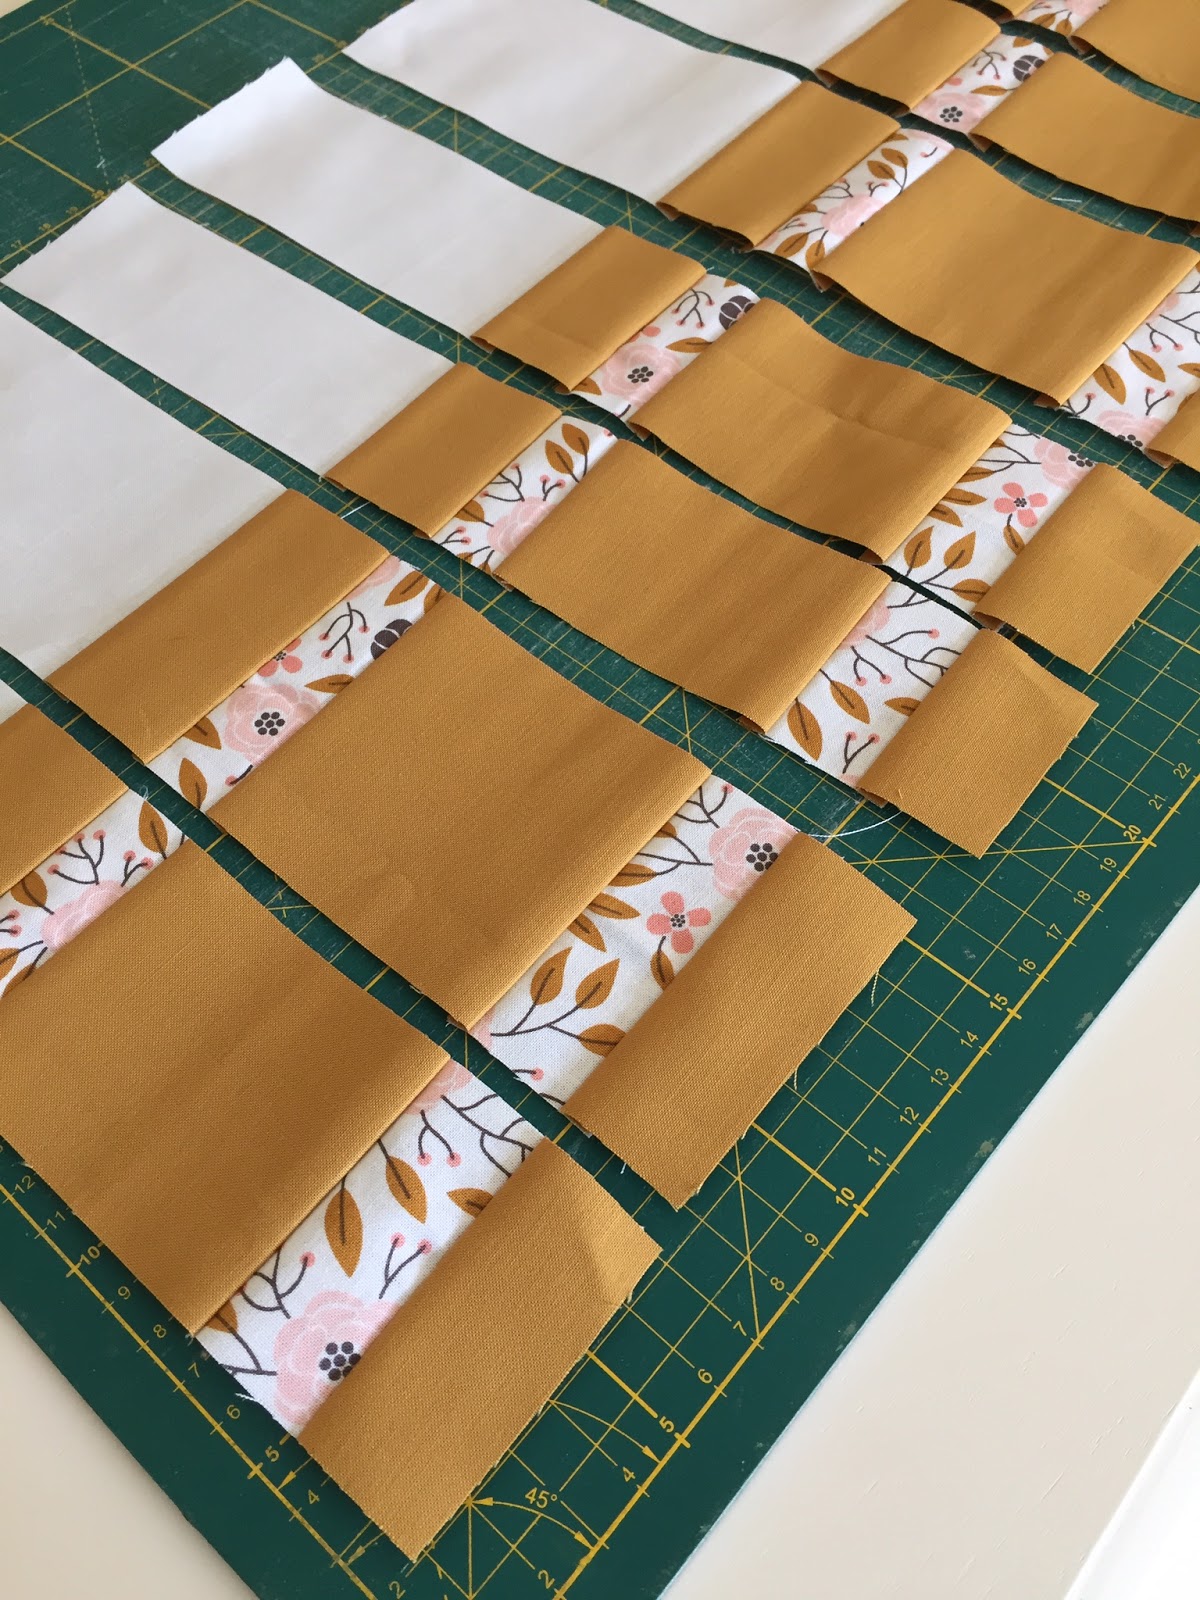
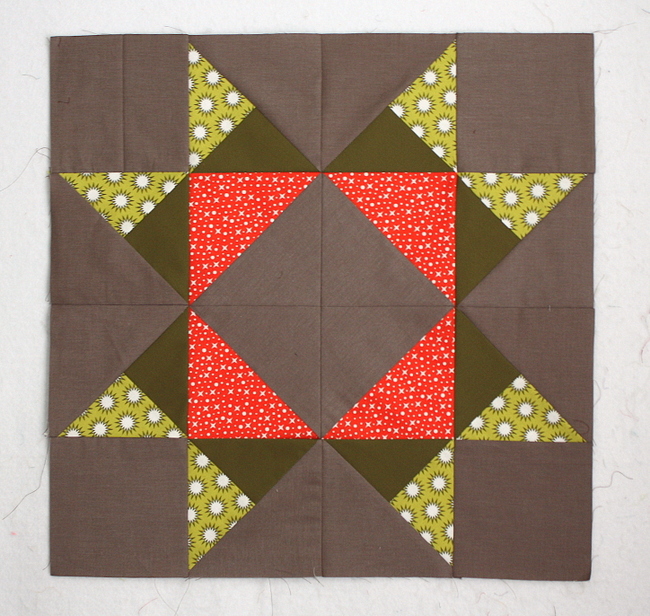
Each block requires 3 10″ x 10″ squares. So before doing any cutting or piecing, I mixed and matched my 10″ precut squares into 6 sets of contrasting or complementing prints and colors. That way I knew I was getting a nice variety of colors, prints, and combinations.

ruler and rotary cutter

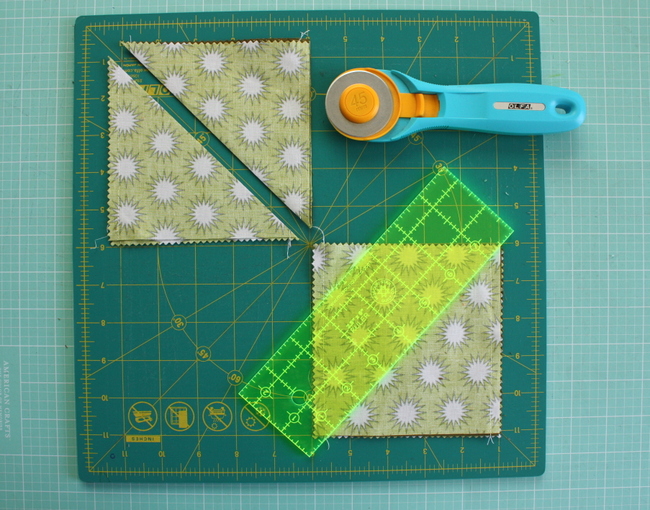
From there I assembly-lined cutting and piecing my blocks. One thing that really helped were these custom rulers from MSQC – they come in 2 1/2″ x 8″ and 5″ x 15″ sizes. They are PERFECT for working with precuts – especially cutting those pre-cut 5″ and 10″ squares on the diagonal, without having to get out a bigger ruler. You can follow along by watching Jenny’s tutorial!

Amy Smart Missouri Star Quilt tutorial

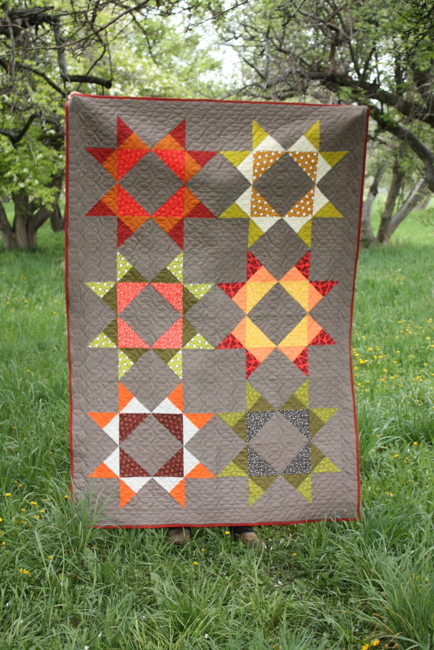
I was originally going to make just a wall size quilt using 4 quilt blocks, but I liked the fabric and the block so much, I added two more blocks for a lap-size quilt. (My quilt finished at 52″ x 75″.) I think I would have kept making more blocks if I’d had more fabric on hand!

pinnable

I definitely want to make this pattern again – the blocks come together SO quickly – and because the scale of the finished blocks is 23″ x 23″ so you don’t need to make a lot of them. It would be a quick way to make a large bed quilt.

In the meantime, I’m claiming this quilt as my snuggle quilt to carry around to soccer games, picnics, and Sunday afternoon naps. The bold colors make a statement, but the warm, taupe background will hopefully hide some of the evidence of everyday use.

Missouri Star Quilt Company

Here’s one more parting shot of the giant Missouri Star in the MSQC trims shop. Appropriate, don’t you think? Thanks so much for having me Missouri Star! It was a blast to visit in person, and I’m so excited to have my Missouri Star Quilt as a reminder.

Blog: www.diaryofaquilter.com

Facebook: https://www.facebook.com/diaryofaquilter/

Instagram: https://www.instagram.com/diaryofaquilter/

Mini Periwinkle or Mini Wacky Web Tutorial Reboot Featuring Guest Blogger Rebecca Bryan

Revisited Quilting Tutorials from Missouri Star Quilt Co

Make a Mini Periwinkle Quilt with this Free Step by Step Tutorial! Featuring Rebecca Bryan!

Hi everyone! I’m Rebecca Bryan, of Bryan House Quilts, and author of Modern Rainbow: 14 Imaginative Quilts that Play with Color (Stash Books, 2015). I’ve been quilting from a fairly young age having grown up around quilting. I’ve always been artistically inclined, and quilting has been a constant way for me to keep creating and discovering.

Today, I’m showing you my mini or table topper version of the Mini Wacky Web/Mini Periwinkle. Some of my favorite quilt designs center around a simple, geometric block. Which is why I chose to use Jenny’s lovely Mini Wacky Web Tutorial. The Mini Wacky Web is perfect for me!

Ready? Quack! Let’s go. 🙂

Make a Mini Periwinkle Quilt with this Free Step by Step Tutorial!


Make Quilting Easier with the Sizzix Fabi Machine! Easy Periwinkle Quilt Tutorial

For my cutting, I used my Sizzix Fabi and Mini Wacky Web Die to cut up my Cotton Couture charm pack. You could also use the Mini Wacky Web Template (Jenny shows you how in the original YouTube tutorial).


Make a Mini Periwinkle Quilt with this Free Step by Step Tutorial!

Here’s a glimpse of my process. I wanted to choose my colors fairly randomly (but let’s face it, I still like to choose favorites) so I used a ceramic fruit basket to toss the colors about. I made all my blocks just as Jenny instructs. To make a table topper, I decided to make 16 blocks.

Make a Mini Periwinkle Quilt with this Free Step by Step Tutorial!

At this point, I was loving my blocks. But to make each block pop, I decided to add 1” turquoise sashings and borders.

Make a Mini Periwinkle Quilt with this Free Step by Step Tutorial!

The unfinished Mini Wacky Web block measures just around 6”. So I cut 2 strips of 1 1/2” widths of fabric from my turquoise yardage. Then I subcut 12 rectangles 1 1/2” x 6”. After I decided on my block layout, I added a 1 1/2” x 6” strip to the right side of 12 blocks. And then sewed the blocks into rows.

Make a Mini Periwinkle Quilt with this Free Step by Step Tutorial!

Then I added 1 1/2” x 25 1/2” sashing strips between the rows and sewed the rows together.

Make a Mini Periwinkle Quilt with this Free Step by Step Tutorial!

To finish off the quilt top, I added 1 1/2” x 26 1/2” borders to each side.

Instead of machine quilting this table topper, I couldn’t resist hand quilting with black perle #8 thread. I love hand quilting, especially small projects. 🙂

Make a Mini Periwinkle Quilt with this Free Step by Step Tutorial!

This was so much fun to make – so bright and happy. Thank for having me MSQC! And thank you for reading!

Click on the button to watch the original tutorial and get all the supplies used in Rebecca’s version!

watch tutorial shop supplies

Make a Mini Periwinkle Quilt with this Free Step by Step Tutorial!


mm bundles

We want you to make your own, so 2 Lucky Winners are going to get a Michael Miller Cotton Couture fabric bundle! Enter below:

a Rafflecopter giveaway

Here’s where you can find Rebecca Bryan of Bryan House Quilts on the web:

Blog: https://bryanhousequilts.com/

Facebook: https://www.facebook.com/bryanhousequilts

Instagram: @bryanhousequilts

Make a Mini Periwinkle Quilt with this Free Step by Step Tutorial!

Tutorial Reboot Featuring Guest Blogger Nicole Daksiewicz

Revisited Quilting Tutorials from Missouri Star Quilt Co

nicole modern handcraft tutorial reboot

Hello, my name is Nicole Daksiewicz and I sew and blog over at Modern Handcraft, where I share my current projects and free sewing tutorials. I was so excited when they contacted me about joining the Tutorial Re-boot series here at Missouri Star Quilt Company. I have been a huge fan of the website and of Jenny’s since I first started quilting, and since joining the Sizzix Design team where they offer a huge assortment of MSQC dies that are so helpful!

Make a Star Wars Quilt using the Chopped Block Pattern! Free Step by Step Instructions and Video Tutorial!

One of the reasons I started quilting is that I was searching for nursery decor when I was pregnant with my first son and just couldn’t find anything that I loved. Fast forward to today’s project – my take on the Chopped Block Quilt which is a quilt I am making for my son’s Star Wars themed room. Kids bedding is a tricky one, usually the bed sets you find at the store are cheap quality and are not exactly the colors your child wants in his room. Luckily MSQC has a great assortment of novelty fabrics, including the Star Wars fabric I used in this project along with a pop of color that my son loves and matches the artwork we bought for his room.

Make a Star Wars Quilt using the Chopped Block Pattern! Free Step by Step Instructions and Video Tutorial!

The quilt I chose, the Chopped Block, is a beautifully simple quilt that was so so much fun to make. It can be very modern in appearance depending on the fabrics used and is a perfect project for a quilter that is just starting out! In the YouTube tutorial, Jenny uses pre-cut jelly rolls and charm packs.

The fabric we wanted to use unfortunately did not come in pre-cuts, but that doesn’t mean we couldn’t use them, we just had to do a little math using the fabric allowance chart and do a little extra cutting.

Screenshot 2016-01-26 16.56.41

For my fabrics I chose to use Kona White as my main fabric for my background, backing and binding. The remaining prints for the blocks are Kona Bahama Blue solid, Star Wars Grid in Black, Star Wars Logo in Black and Blueberry Park neutral black strand. One yard of each print fabric is the perfect amount for the size quilt I made with just a little left over for some pillows.

Once you have all of your fabrics prepped, it’s time to make each block. We will start with a patterned center for the first block. You will make the same number of patterned center blocks as solid center blocks since you will be cutting and shuffling in the next step. Take your 4.5″ patterned square and join a 4.5″ x 2.5″ solid strip of fabric to each side, press seams.

Make a Star Wars Quilt using the Chopped Block Pattern! Free Step by Step Instructions and Video Tutorial!

Add your 8.5″ x 2.5″ solid strips to the remaining sides, press seams.

Make a Star Wars Quilt using the Chopped Block Pattern! Free Step by Step Instructions and Video Tutorial!

Now add your 8.5″ x 2.5″ patterned strips to two sides, press seams.

Make a Star Wars Quilt using the Chopped Block Pattern! Free Step by Step Instructions and Video Tutorial!

Add the final patterned 12.5″ x 2.5″ strips to the remaining sides, press seams.

Make a Star Wars Quilt using the Chopped Block Pattern! Free Step by Step Instructions and Video Tutorial!

For the chop and shuffle step you will first need to cut your blocks into 4 sections, in half and in half again. The trick I have for making cutting the blocks is to line up your outside middle square line to the 2″ line on a ruler and the outside line of the middle fabric to the 4″ line on the ruler. This will make for fast cuts and ensure that everything is nice and straight.

Make a Star Wars Quilt using the Chopped Block Pattern! Free Step by Step Instructions and Video Tutorial!

You will join two pieces of solid center block with patterned center block to create the chopped block design, isn’t that fun?!

Make a Star Wars Quilt using the Chopped Block Pattern! Free Step by Step Instructions and Video Tutorial!

Once you get into the groove of sewing all of your parts together this is a fantastic project for chain piecing. It comes together really fast!

Make a Star Wars Quilt using the Chopped Block Pattern! Free Step by Step Instructions and Video Tutorial!

Before you know it you will have a whole stack of Chopped Blocks finished! The instructions now have border information for you to use. I altered my twin size a bit and left the half blocks off of the top and bottom and just went with a 6″ border around the entire quilt. My son’s bunk bed is a little smaller than a normal twin sized bed so making it a little smaller so it will fit inside the bed nicely.

Make a Star Wars Quilt using the Chopped Block Pattern! Free Step by Step Instructions and Video Tutorial!

I hope you enjoy this project as much as I did! The video instructions are fantastic and I honestly believe beginners to expert quilters would enjoy making this quilt. Here are some more photos of my finished quilt along with the inspiration for my color choices.

Make a Star Wars Quilt using the Chopped Block Pattern! Free Step by Step Instructions and Video Tutorial!

Make a Star Wars Quilt using the Chopped Block Pattern! Free Step by Step Instructions and Video Tutorial!

Make a Star Wars Quilt using the Chopped Block Pattern! Free Step by Step Instructions and Video Tutorial!

Make a Star Wars Quilt using the Chopped Block Pattern! Free Step by Step Instructions and Video Tutorial!

Thank you so much for allowing me to share my version of the Chopped Block Quilt with you here at MSQC!

You can find more of my work at the following places:

Website: www.modernhandcraft.com

Instagram: www.instagram.com/modernhandcraft

Facebook: www.facebook.com/modernhandcraft

Tutorial Reboot: Irish Chain Quilt Featuring Guest Blogger Heather Jones

Revisited Quilting Tutorials from Missouri Star Quilt Co

heather jones tutorial reboot

Hello! I’m Heather Jones of Heather Jones Studio and author of the new book Quilt Local: Finding Inspiration in the Everyday (STC Craft | A Melanie Falick Book, 2015). I’m so excited to be guest blogging here at the Missouri Star Quilt Company Blog today. I’ve been a huge fan of Jenny’s for a long time and I especially love how accessible she makes quilting with all of her great free tutorials! I began quilting regularly about five years ago, although I have loved quilts my whole life. But, my great-great aunt Ollie is the only person in my family who quilted, so I didn’t grow up with quilts being made around me. So for many years I was kind of intimidated to start quilting, although I loved them so much. Lucky for us all, we have Jenny to teach us and virtually hold our hands throughout the process so can make just about anything with her help.

Make a gorgeous Irish Chain Quilt with Jenny Doan and Heather Jones!

Today, I’m sharing a quilt I made using Jenny’s Irish Chain tutorial. If you’re familiar with my own work, it should be no surprise at all that I’m drawn to minimalist designs, and when paired down to two solids colors, the Irish Chain is a perfect project. I have always wanted to make one of these designs so this was the perfect opportunity for me to finally get started. It’s a simple pattern that uses a nine patch block and a square of background fabric, and when arranged in this manner, the nine patch blocks create chains throughout the design.

image005

In Jenny’s tutorial she uses precut strips of fabric for her blocks, which is certainly a great choice for this project. I however, picked two colors of Robert Kaufman Kona Cotton, Sky for the background and Pickle for the chains, so I cut my strips from yardage.

I made a twin sized version using 3 ¾ yards of Sky, 1 ¾ yards of Pickle, and 4 1/8 yards of Kona Fog for the back. I also used an additional ½ yard of Sky for the binding.

image007

As I mentioned, Jenny’s tutorial used a jelly roll precut, which is fabric cut in 2 ½” x WOF (width of fabric) strips.

image009

So, I cut my yardage in those sizes, specifically cutting (19) 2 ½” x WOF strips of Sky and (23) 2 ½” x WOF strips of Pickle. I also cut (72) 6 ½” x 6 ½” squares of Sky for the background blocks out of my yardage.

image011

The nine patch blocks are made out of strip sets, and for this size quilt, you need nine outside strips, made of two Pickle strips and one Sky, with the Pickle on the outside of the strip set, as shown above. You also need five inside strip sets, using one Pickle and two Sky, with the Pickle on the inside of the strip set.

image013

Each nine patch is made out of two outside strip sets and one inside strip set.

image015

One the strip sets are made, construction is so easy, and with a little chain piecing, these blocks come together very quickly. Jenny shares tips in her tutorial to make sure the seams nestle throughout the blocks that make all those little square line up so neatly!

image017

And once the nine patch blocks are finished, it’s just a matter of alternating them with the background blocks to make the chains throughout the pattern.

image019

Once the top and back were finished, I quilted it with my go-to allover freehand figure eight design. This has become my favorite quilting design because of its simplicity and I think it works well with so many quilt patterns. I used Aurifil 2600 (Dove) 40 weight for the quilting, which I think works really well with the colors in my quilt.

Make an Irish Chain Quilt with this Free Tutorial!

I used Sky for the binding and I love how it disappears into the background of the design.

image023

And here’s a shot of the back, where you can see the Kona Fog that I used for the backing. It’s a bit darker blue that I think works really well with both the Sky and the Pickle.

Thanks so much for letting me share my project with you here at MSQC!

You can see more of me and my work at the following places around the web:

Blog: www.HeatherJonesStudio.com/blog
Instagram: www.instagram.com/heatherjonesstudio
Facebook: www.Facebook.com/OliveAndOllie

shop for supplies tutorial button

irish chain pinnable 2

Tutorial Reboot: Broken Bars Quilt Featuring Guest Blogger Cristina Tepsick

Revisited Quilting Tutorials from Missouri Star Quilt Co

cristina

Hi Y’all. I’m Cristina Tepsick from Pretty Little Quilts and I’m really excited to be here today! I’m a mother of three, an active duty member of the US Air Force, and a quilter. I started quilting a few years ago to occupy my time when I had to be separated from my family, and although those months were miserably lonely, quilting gave me a tangible way that I could express my love for them. It makes me teary just thinking about it, but I don’t want to depress everyone, so let’s get started with the tutorial!

broken bars cristina pinnable

Today I’m going to be showing you what I did with Jenny’s Broken Bars tutorial. When I was looking at her quilt it reminded me of rows of books. I absolutely love reading, so I knew this was the project for me. It’s such a simple project that yields some amazing results.

I used a fat quarter bundle of Magnolia fabric by Camelot Designs, and coordinated it with some Bella Solids. Although this fabric is modern, the warm color palette and florals really give it a romantic feel, and in the quilt it reminds me of a Jane Austen library.

To make the quilt, I first took my fat quarters and paired them up in sets of two.

Then I cut the pairs of fabric into strips between 7-11 inches. In Jenny’s tutorial you’ll see how she made hers into 10in strips and I used her method, with the exception of changing up the sizes. You really want to vary your strip sizes of your patterned fabric to give it that authentic bookshelf feel.

To give it a little more detail, I cut smaller strips of fabric (1in-2in) from each of the fat quarters and used the coordinating fabric (from the sets) to give it a little more interest. Let me show you how I did it in this one:

First took a set of 10in strips. Then I cut some 1 1/2in strips off the bottom.

I had a remaining 7in strip piece that I cut into three parts and sewed the 1 1/2 strips of the alternating fabric in between. Then I cut a strip of white fabric and sewed it to the top. My final rows were 12in, but I cut the white strips so the row would be a little taller so I could trim them down later. (Note: Since each of the colored fabric are different sizes, each of your white strips will also be different sizes to meet the 12in row size.)

Once you have that all together, just use your ruler to cut your “bars”. I varied the width of each of mine from 2in-3 1/2in, but the great thing about this project, is there are no specific rules, so you cut them however you like.

I made each of my strip sets different, and the funnest part was sewing them together into blocks. A good tip in Jenny’s tutorial that I would like to emphasize is deciding how many bars (or books) you want in each block, because the more bars you add the wonkier it gets. Each of my blocks were 10 bars (or about 20 inches) and I had used two per row.

Then the hard part was done. It’s a no borders quilt, but you could absolutely add borders or strips of fabric between each row to make it look more like a bookshelf.

This was a really fun and easy project and I hope it gives you some inspiration for making your own quilt!! To see more of my work you can follow my blog, Pretty Little Quilts, or follow me on Instagram @prettylittlequilts.

THANK YOU, Cristina!! We loved having you and love what you’ve done with the Broken Bars pattern!!! If you’ve made it this far in the post, we’ve decided to do a little giveaway to go with this fun project! We’re giving away 1 Magnolia Fat Quarter Bundle to one quilter! Here’s what you have to do to win:

a Rafflecopter giveaway

cristina pinnable