Make Life Happy!

We just got the new line, Make Life (by Sweetwater, for Moda) in our shop and let me say, it is happy and bright.  I love it more than I thought I would!  We couldn’t wait to cut into it and make something.

Natalie put together a quilt using this line and we wanted to give you the directions so that you can make one for yourself!  This is a great pattern and has very LITTLE waste!  You will almost use every piece of both the jelly roll and layer cake.
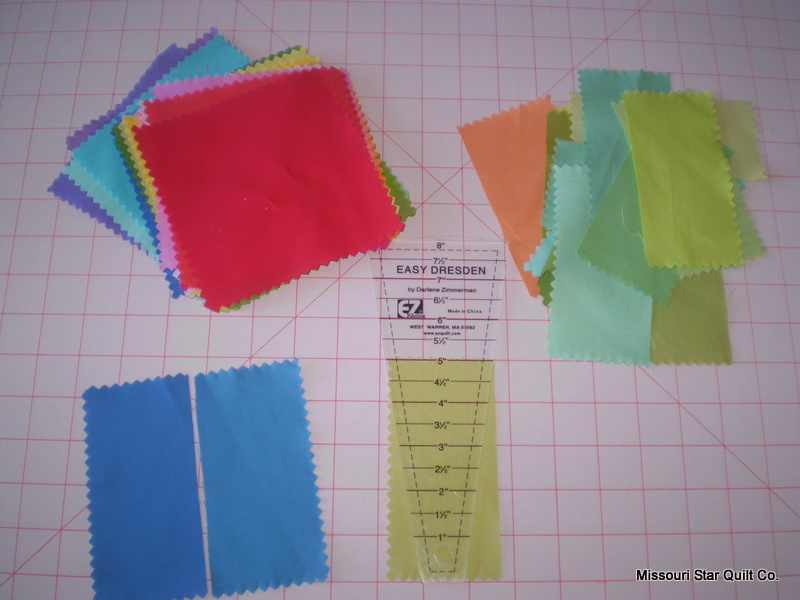
You will need:

1-layer cake

1-jelly roll

Directions:  First cut your layer cake squares in half (5X10″ pieces)

then cut your jelly roll strips into 10″ strips.  (each strip will give you 4- 10″pieces)  2 1/2 X 10″ strips

Once you have all the cutting done, you take two Jelly roll strips (matching pieces) and sew on either side of the 5X10″ strips.  (each block should have one layer cake piece in the middle, with a jelly roll strip on each side)

Continue mixing and matching jelly roll pieces with the layer cake pieces, till all your strips are sewn together.

Then take your block and square them up to nine inches.

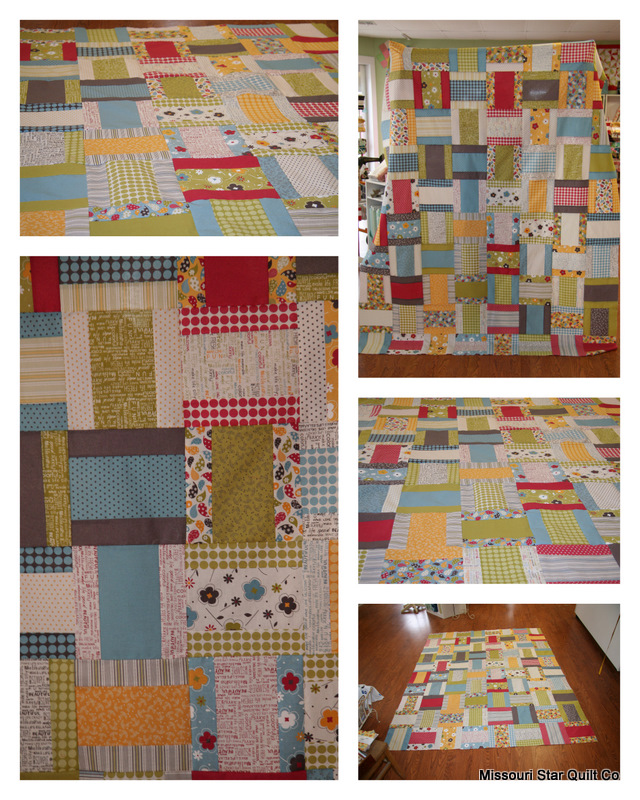
All you have left to do is lay it out and sew the blocks together!  Alternate the blocks to create the pattern.

Here is a picture of ours before it is quilted.  We are still deciding on borders and will update you when we are all finished!!

Finished top (without borders) is 68 X 86

Have fun putting this easy peasy quilt top together!  When we are finished with this we will have a pattern for you to down load.  Have a great day!

Spring is in the air….

A girl can dream, right!?  We have had such a long winter (it sure feels that way, anyway) that I am SO looking forward to spring.  So the name of this quilt is very fitting and I can’t wait to display it in the shop for everyone to see.

So, yes we just got this quilt finished and I couldn’t wait to show you.  We used the Brandon Mably, Spring Design roll and a pattern called the Friendship Braid, from this book, and I love how it went together!

quilt stuff987

Don’t the colors just POP against that black!  I just really love how it turned out.    Mom quilted it with the pattern called sticky buns  (so cute) and I think it fits the quilt nicely.

Well, today I am off to take my kids to the Dentist.  (yes, ALL of them)  It’s gonna be fun.  Wish me luck.  I really think I am gonna need it.

Getting things done….

Another quilt marked off the ‘to-do’ list!  We had some insane last few months and have had several quilts (shop samples and personal projects )  take a back seat.

You may remember me showing you my first work in progress *ahem*several months ago.  It was a disappearing nine patch for my daughter, made out of Sweet, by Urban Chiks. Now, I am gonna be honest here and tell you all that I only got half the quilt done.  I did have it all sewn and cut up (ready to go) but Mom (Jenny) actually finished it for me!

Okay, so I am so excited!  It is gorgeous!  Seriously, my favorite!  I love it so much, that I don’t even want to give it to my daughter!!  (is that bad?  Tell me you haven’t felt the same way about a quilt you made?)  I really do.  It has to be the ‘Sweetest” quilt I have ever seen.  I am really considering re-decorating my entire bedroom around it.  (boy, I am glad my husband doesn’t read this blog!)

See what I mean….

quilt stuff9871I know, right?  You want it too!  Sigh…I am still considering bribing her with another beautiful fabric line.  She does really like Swanky….

Well, it does feel really good to have this quilt done.  We have actually been working like crazy to get things done around here.  We’ve got a bunch of new quilts to show you…and another free pattern in the works!

Hope you have a fabulous day!

Apron Tea Towel Pattern

Recently Mom got a great idea from one of our local gals around a quick and easy apron. You’re going to have to use your imagination a little bit here, but it so so so so easy! And it’s super cheap! Like $3 bucks if you have some scraps laying around for the pockets and straps, how awesome is that!!

The video is a little lengthy because there’s quite a few steps, but it should be really easy to follow along, or if you like the written word, we had a lot of ladies asking for it on the forums so we posted it there (Tea towel pattern on the forums) or go ahead and grab it right here –

Color Wheel= Sunshine

So yes, its been snowing, and its really cold!  I don’t know about all of you but about this time of year I start to miss the sunshine 🙂 So, I thought, what could I do to brighten up my day?  Well sewing something usually helps and sewing something bright is even better!

I’ve been dying to use a Kona Solids Charm pack so here it is!

I took one charm pack and cut each 5″ square into a 2.5″ rectangle.P1010001

Then I took my dresden ruler and cut twenty of them into dresden plate triangles.

lovely scraps!
lovely scraps!

I assembled the Dresden plate and machine appliqued it onto a black background (15.5″ square). I also machine appliqued the black center circle.

Then I took the remaining rectangles from the charm pack and made a piano key border for the dresden. It measures approx. 25 inches square.

I still need to decide how to quilt it. and what color thread to use! (the really tough choices:) I absolutely love this little mini quilt! It is so bright and cheerful! and so easy peasy… This is a perfect project for a dreary winter afternoon! Enjoy!

All done!
All done!